Proxmox
- Sécurisation basique de son Proxmox
- Unprivileged LXCs - Mount CIFS shares
- Configuring Proxmox to use NAT Networking
- Resizing (or removing) Local-LVM
- Proxmox GPU passthrough for Jellyfin LXC with NVIDIA Graphics card (GTX1050 ti)
- Installer Windows sous Proxmox
- Bugs & Fixs
Sécurisation basique de son Proxmox
Je vois sur Internet des serveurs Proxmox pas sécurisés voire pire, des conseils qui préconisent d’utiliser un firewall comme pfSense installé en machine virtuelle pour sécuriser l’hyperviseur, alors que ce dernier est hébergé chez un fournisseur dont on ne sait rien du réseau. Votre fournisseur peut proposer un firewall comme chez OVH avec son système anti-DDoS, mais cela ne vous protège que de l’extérieur, pas de l’intérieur du réseau, qui lui comporte une multitude de serveurs d’autres clients.
La logique pour un réseau en entreprise ou chez soi, pour un home lab ou de l’auto-hébergement sera la même.
Quel que soit l’hyperviseur, il faut que celui-ci soit sécurisé. S’il n’est pas sécurisé, toutes vos machines virtuelles ou vos conteneurs sont potentiellement compromis.
Pour citer Andy Grove, co-fondateur d'Intel, dans son livre autobiographique qui porte le même nom : « Seuls les paranoïaques survivent ».
[Wikipedia]: Il explique dans sa biographie Seuls les paranoïaques survivent que le moteur psychique qui lui a permis de mener son entreprise au sommet a été durant 38 ans
Ce concept est parfaitement adapté pour la sécurité.
1. Protection physique
Le ou les serveurs doivent être à minima protégés physiquement, comme une salle sécurisée, ou si dans un datacenter, dans une baie fermée à clefs. Mais il est aussi important de protéger l’accès au BIOS/UEFI par un mot de passe costaud et interdire le boot sur autre chose que l’hyperviseur.
Il serait dommage qu’une personne avec une clef usb boote sur un autre OS, et modifie le mot de passe root, formate le ou les disques où sont installés Proxmox, etc.
Les sociétés qui fournissent des serveurs comme OVH, Scaleway, etc. peuvent avoir dans leurs employés des personnes mal intentionnées, tout comme dans vos collègues de travail ou prestataires.
2. Firewall
Proxmox intègre un firewall agissant sur 3 parties distinctes :
- Datacenter
- Serveur Proxmox alias PVE
- Machines virtuelles et conteneurs LXC
La partie machine virtuelle et conteneurs est indépendante des deux autres. Elle n’a pas d'intérêt dans la sécurisation du serveur Proxmox.
Je me base seulement pour un seul hôte Proxmox, qui dans ce cas le fait de faire les règles au niveau du data center ou du node n’aura pas forcément d’impact.
2.1 Ports utilisés par Proxmox
Proxmox utilise par défaut ces ports pour fonctionner.
Si vous modifiez le port SSH, utilisez le même port sur tous les serveurs du cluster au risque d’avoir des surprises.
| Services | Protocole | Ports |
|---|---|---|
| Web interface | TCP | 8006 |
| SSHd | SSH | 22 |
| pvedaemon (en écoute) | TCP | 85 |
| rpcbind | TCP | 111 |
| corosync multicast (pour les clusters) | UDP | 5404, 5405 |
| SPICE proxy | TCP | 3128 |
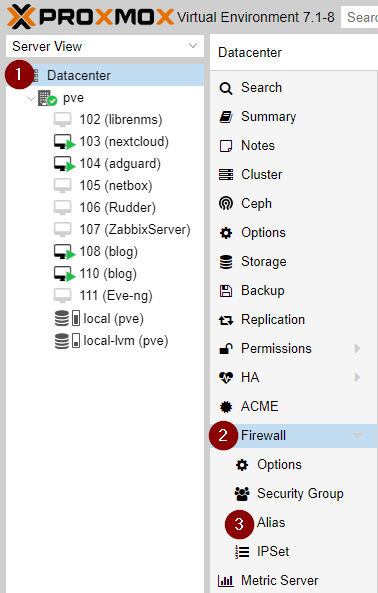
2.2 Alias
Alias se trouve dans la partie firewall du Datacenter et va permettre de nommer les IP ou les plages d’IP à utiliser dans le firewall.
C’est une habitude de travail de créer des alias, ça évite les oublis, ça permet aussi d’aller plus vite quand on a une correction à effectuer sur une grosse quantité de règles de filtrage.
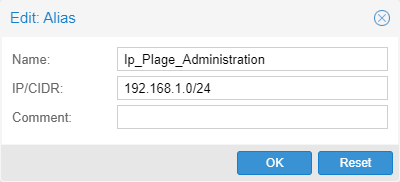
2.2.1 Plage d’IP
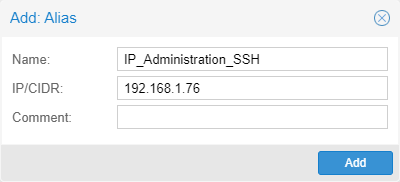
2.2.2 Une IP
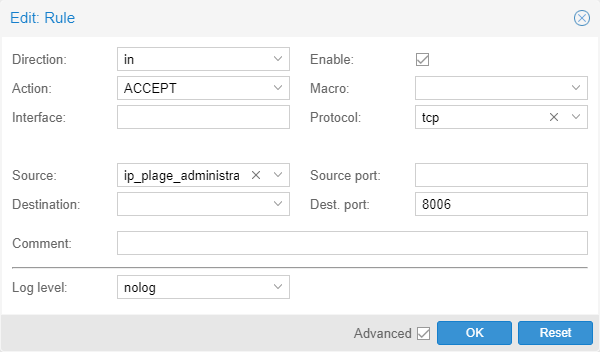
2.3 Règles de firewall
Rien de compliqué, on autorise en entrée le port 8006, le SSH, le ping. Et comme ce n'est qu’un seul node, pas besoin de préciser la destination (pas idéal, mais cela simplifie les choses) ni l’interface sur laquelle le trafic doit passer, qui de toute façon pour un seul node sera vmbr0.
| Direction | Action | Source | Protocol | Destination Port | Log Level | Comment |
|---|---|---|---|---|---|---|
| in | ALLOW | tcp | 8006 | nolog | web GUI | |
| in | ALLOW | tcp | 22 | nolog | ssh | |
| in | ALLOW | icmp | nolog | ping |
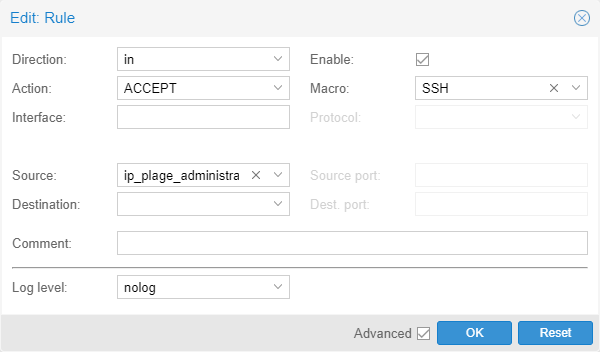
2.3.1 Macro
Il est possible d’utiliser des macros de configuration pour certains protocoles comme le SSH ou le protocole SMB qui a besoin d’ouverture de plusieurs ports (TCP 445, TCP 139, UDP 138-139), cela facilite grandement la lecture des règles si vous devez l’utiliser.
2.3.2 Protocole
2.4 Chef, je me suis coupé la main !
En console, il est possible de désactiver le firewall
Éditez le fichier /etc/pve/firewall/cluster.fw et remplacez la valeur 1 par 0.
[OPTIONS]

enable: 1
2.5 Utilisation de pfsense pour les VM
Je vous oriente sur le site de qui a 3 articles sur le sujet :
Et aussi le script bash de disponible sur son GitHub :
3. Fail2Ban
3.1 Installation de Fail2Ban
apt install fail2ban3.2 Configuration de fail2Ban
Editez le fichier :/etc/fail2ban/jail.local
[proxmox]
enabled = true
port = https,http,8006
filter = proxmox
backend = systemd
maxretry = 3
findtime = 2d
bantime = 1h

[sshd]
enabled = true
port = ssh
filter = sshd
logpath = journal
backend = systemd
maxretry = 2
findtime = 300
banaction = iptables-allports
bantime = 86400
ignoreip = 127.0.0.1
/etc/fail2ban/filter.d/proxmox.conf
[Definition]
failregex = pvedaemon\[.*authentication failure; rhost=<HOST> user=.* msg=.*
ignoreregex =
journalmatch = _SYSTEMD_UNIT=pvedaemon.service
Relancer le service de Fail2Ban
systemctl restart fail2ban.serviceSources : wiki Proxmox
3.3 Les commandes utiles de Fail2Ban
3.3.1 Bannir une IP
fail2ban-client set [nom du jail] banip [IP à bannir]3.3.2 Enlever le ban d’une IP
fail2ban-client set [nom du jail] unbanip [IP concerné]3.3.3 Lister les règles
fail2ban-client status

Status
|- Number of jail:      1
`- Jail list:   sshd
3.3.4 Détails d’une règle
fail2ban-client status sshd

Status for the jail: sshd
|- Filter
|  |- Currently failed: 0
|  |- Total failed:     5
|  `- File list:        /var/log/auth.log
`- Actions
   |- Currently banned: 1
   |- Total banned:     1
   `- Banned IP list:   192.168.1.21
Et si l’on veut en savoir plus sur les tentatives de connexion, il faut regarder dans /var/log/auth.log
tail /var/log/auth.log

Dec  9 12:46:14 pve sshd[3769206]: Failed password for nidouille from 192.168.1.21 port 39516 ssh2
Dec  9 12:46:18 pve sshd[3769206]: Failed password for nidouille from 192.168.1.21 port 39516 ssh2
Dec  9 12:46:22 pve sshd[3769206]: Failed password for nidouille from 192.168.1.21 port 39516 ssh2
Dec  9 12:46:23 pve sshd[3769206]: Connection closed by authenticating user nidouille 192.168.1.21 port 39516 [preauth]
Dec  9 12:46:23 pve sshd[3769206]: PAM 2 more authentication failures; logname= uid=0 euid=0 tty=ssh ruser= rhost=192.168.1.21  user=nidouille
4. SSH
Par défaut, Proxmox ne propose qu’un compte utilisateur : root. On va le sécuriser à minima pour les connexions SSH.
Voici les options activées après une installation d’un node dans /etc/ssh/sshd_config, et ce n’est pas fou.
PermitRootLogin yes

# Change to yes to enable challenge-response passwords (beware issues with
# some PAM modules and threads)
ChallengeResponseAuthentication no

UsePAM yes
X11Forwarding yes
PrintMotd no

# Allow client to pass locale environment variables
AcceptEnv LANG LC_*

# override default of no subsystems
Subsystem       sftp    /usr/lib/openssh/sftp-server
Fail2Ban amène une protection pour les attaques par brute force, mais si on garde l’utilisateur root pour l'accès distant en ssh, on va monter d’un cran la sécurité en obligeant la connexion via clefs. Je ne saurais que trop conseiller la désactivation de l’utilisateur SSH au profit d’un autre compte système.
Je pars du principe que vous avez vos clefs SSH privés et publique.
Dans /root/.ssh/authorized_keys, vous allez renseigner votre clef publique
Puis modifier /etc/ssh/sshd_config pour forcer l'authentification par clefs.
#PermitRootLogin yes
PermitRootLogin prohibit-password
PubkeyAuthentication yes
PasswordAuthentication no
PermitEmptyPassword no

# Change to yes to enable challenge-response passwords (beware issues with
# some PAM modules and threads)
ChallengeResponseAuthentication no

UsePAM yes
X11Forwarding no
PrintMotd no

# Allow client to pass locale environment variables
AcceptEnv LANG LC_*

# override default of no subsystems
Subsystem       sftp    /usr/lib/openssh/sftp-server
5. Comptes utilisateurs
La gestion des comptes utilisateurs peut être précise et déroutante.
De base, on a deux types de comptes utilisateur :
-
PAM (compte système)
-
Proxmox
Auquel on peut rajouter d'autre source d'utilisateur via le menu Realms (non traité ici) :
-
Active Directory
-
LDAP
-
OpenID Connect
Puis, on donne aux utilisateurs deux permissions :
-
Path
-
Role
Il est bien sûr possible de créer des groupes d'utilisateurs, de nouveaux rôles en associant les privilèges que l'on désire et de créer des pools regroupant des VM et des datastores pour encore affiner les droits si besoin.
5.1 Les rôles
Les rôles regroupent les privilèges.
| Nom | Privilèges |
|---|---|
| Administrator | Tous les droits |
| NoAccess | Aucun droits donc aucun accès |
| PVEAdmin | Tout sauf les paramètres systèmes (Sys.PowerMgmt, Sys.Modify, Realm.Allocate) |
| PVEAuditor | Accès en lecture seule |
| PVEDatastoreAdmin | Administration des espaces de stockage et des templates (inclus le backup) |
| PVEDatastoreUser | |
| PVEPoolAdmin | Administration des pools |
| PVEPoolUser | Consultations des pools |
| PVESysAdmin | ACLs utilisateur, audit, console système et journaux système |
| PVETemplateUser | visualiser et cloner des templates |
| PVEUserAdmin | administration des utilisateurs |
| PVEVMAdmin | administrations des VM |
| PVEVMUser | visualisation, sauvegarde, CDROM de configuration, console VM, gestion de l’alimentation VM |
5.2 Comptes système (PAM)
Les comptes PAM sont des comptes systèmes. Les seuls à pouvoir se connecter en SSH ou console.
Pour la création de ce type de compte, en dehors du compte systèmes, le reste peut se faire en console ou via la GUI.
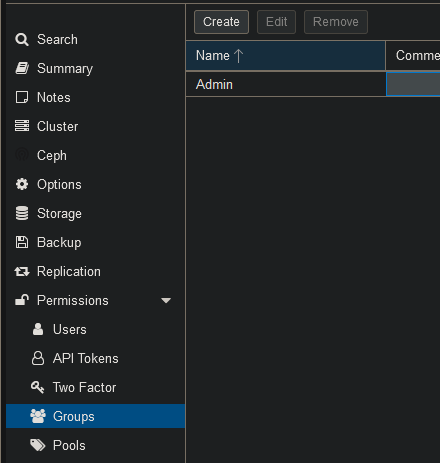
Configuration des permissions
Il faut en premier crée un groupe est configurer ses permission avant de crée l'utilisateur (cela peux aussi être faire après la création de compte)
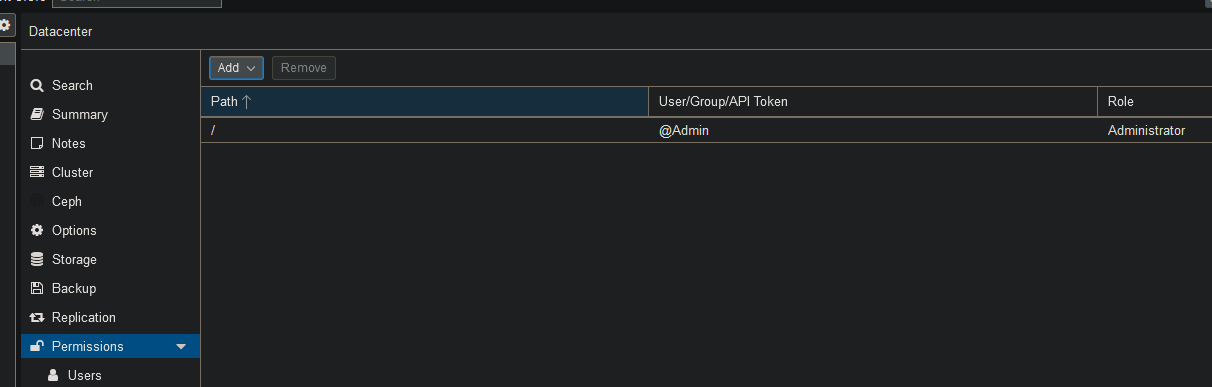
puis nous allons sur la page permission est ajouter les permission voulus a ce groupe
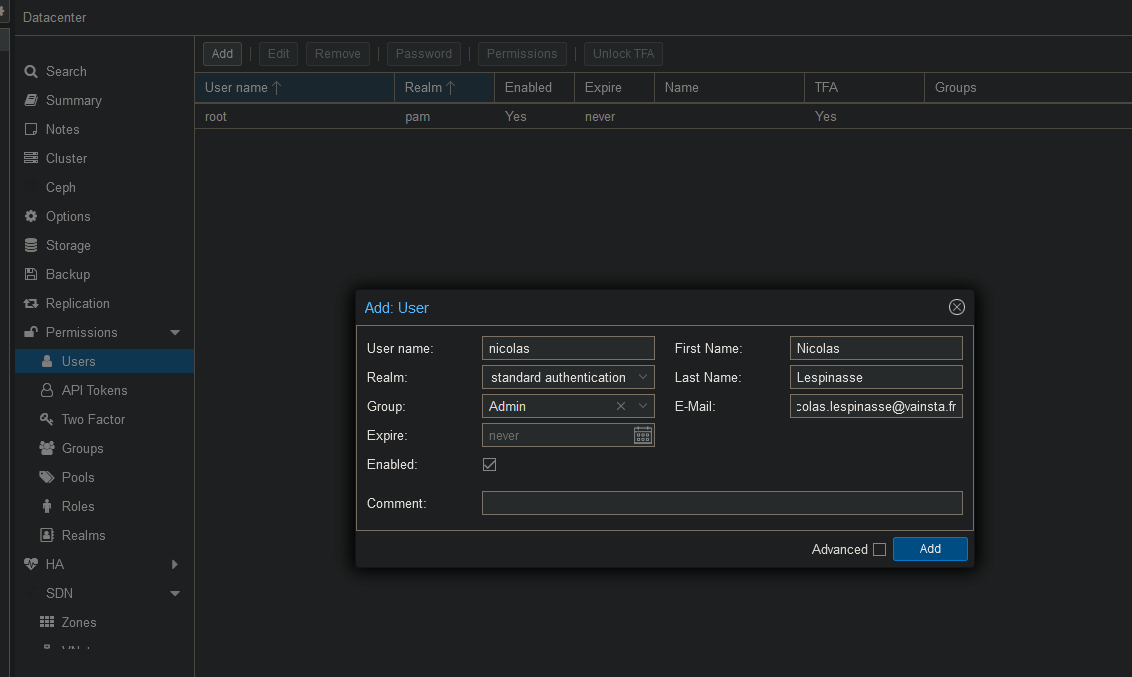
Création du compte système
On ajoute en premier le compte depuis Datacenter -> user
Il faut aussi l'ajouter manuellement sur la machine car il n'existe pas par défaut

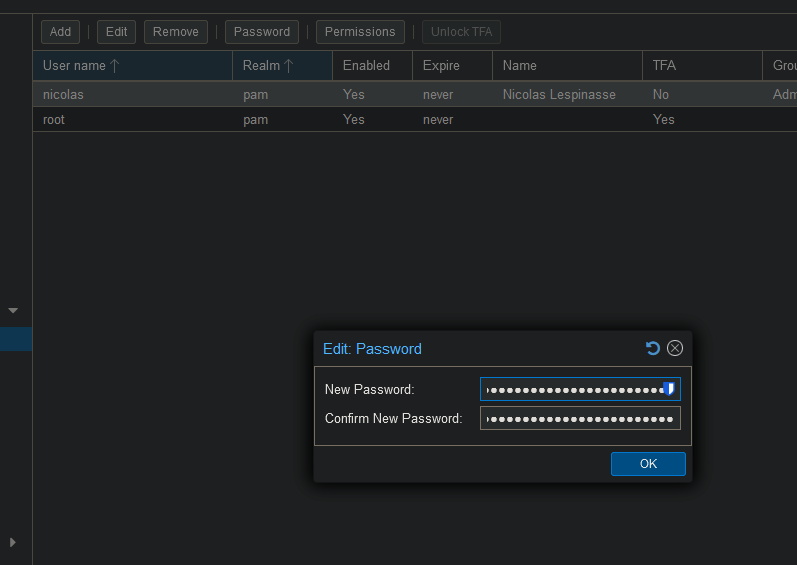
Configuration du mot de passe
Après avoir ajouter le compte sur la machine on peux retourner sur la page Utilisateur et editer le mot de passe
Configuration du Shell
Vu que l'utilisateur a été crée a la main par défaut il n'utilise pas bash il faut donc utiliser cette commande est se déconnecter et reconnecter
chsh -s /bin/bash USER
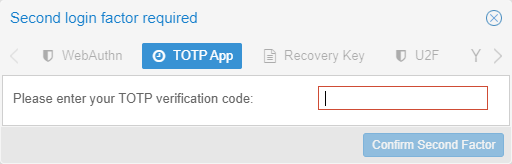
5.3 Authentification à double facteurs TOTP
Pour la mise en place rapide d’une double authentification, la solution du TOTP est idéal. Il faut juste un gestionnaire de mot de passe qui possède cette fonctionnalité comme Bitwarden, LastPass via son application dédiée Authentificator, NordPass, etc., ou des applications dédiées comme LastPass, Authentificator, etc.
Pour en savoir plus sur le TOTP:
Pour le tutoriel, j’utilise Bitwarden (produit très utilisé) pour la génération du code aléatoire. Mais il n’est pas possible sur l’application d’effectuer des captures d’écran, les captures faites le sont sur mon client Bitwarden installé sur mon PC.
Ouvrir Bitwarden sur votre téléphone
Créer un nouvel élément de type identifiant
- Nom pour Bitwarden
- Nom d’utilisateur
- Le mot de passe de l’utilisateur (facultatif)
- Clé authentification (TOTP) : prenez en photo le QR code généré et cela remplira la ligne

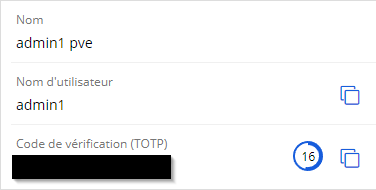
Sauvegarder identifiant créé et ensuite, ouvrez-le. Vous verrez un code généré avec un temps avant la génération d’un nouveau code (30 secondes).
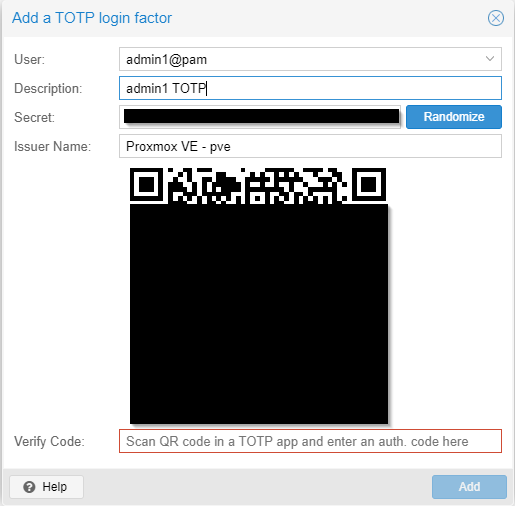
 Rentrer le code dans la boite de dialogue de création de compte TOTP de Proxmox pour activer le TOTP du compte.

Unprivileged LXCs - Mount CIFS shares
The solution provided by the Proxmox Wiki would require many changes to the PVE host config.
https://pve.proxmox.com/wiki/Unprivileged_LXC_containers#Using_local_directory_bind_mount_points
How does it work?
By default CIFS shares are mounted as user root(uid=0) and group root(gid=0) on the PVE host which makes them inaccessible to other users,groups and LXCs.
This is because UIDs/GIDs on the PVE host and LXC guests are both starting at 0. But a UID/GID=0 in an unprivileged LXC is actually a UID/GID=100000 on the PVE host. See the above Proxmox Wiki link for more information on this.
@Jason Bayton's solution was to mount the share on the PVE host with the UID/GID of the LXC-User that is going to access the share. While this is working great for a single user it would not work for different LXCs with different users having different UIDs and GIDs. I mean it would work, but then you would have to create a single mount entry for your CIFS share for each UID/GID.
My solution is doing this slightly different and more effective I think.
You simply mount the CIFS share to the UID that belongs to the unprivileged LXC root user, which by default is always uid=100000.
But instead of also mounting it to the GID of the LXC root user, your are going to create a group in your LXC called lxc_cifs_shares with a gid=10000 which refers to gid=110000 on the PVE host.PVE host (UID=100000/GID=110000) <--> unprivileged LXC (UID=0/GID=10000)
How to configure it
1. In the LXC (run commands as root user)
- Create the group "lxc_shares" with GID=10000 in the LXC which will match the GID=110000 on the PVE host.
groupadd -g 10000 lxc_shares - Add the user(s) that need access to the CIFS share to the group "lxc_shares".
f.e.: jellyfin, plex, ... (the username depends on the application)usermod -aG lxc_shares USERNAME - Shutdown the LXC.
2. On the PVE host (run commands as root user)
- Create the mount point on the PVE host.
mkdir -p /mnt/lxc_shares/nas_rwx - Add NAS CIFS share to
/etc/fstab.
!!! Adjust//NAS/nas/in the middle of the command to match your CIFS hostname (or IP)//NAS/and the share name/nas/. !!!
!!! Adjustuser=smb_username,pass=smb_passwordat the end of the command. !!!
Code:{ echo '' ; echo '# Mount CIFS share on demand with rwx permissions for use in LXCs (manually added)' ; echo '//NAS/nas/ /mnt/lxc_shares/nas_rwx cifs _netdev,x-systemd.automount,noatime,uid=100000,gid=110000,dir_mode=0770,file_mode=0770,user=smb_username,pass=smb_password 0 0' ; } | tee -a /etc/fstab - Mount the share on the PVE host.
mount /mnt/lxc_shares/nas_rwx - Add a bind mount of the share to the LXC config.
!!! Adjust the LXC_ID at the end of the command. !!!
Code:You can mount it in the LXC with read+write+execute (rwx) permissions. { echo 'mp0: /mnt/lxc_shares/nas_rwx/,mp=/mnt/nas' ; } | tee -a /etc/pve/lxc/LXC_ID.conf You can also mount it in the LXC with read-only (ro) permissions. { echo 'mp0: /mnt/lxc_shares/nas_rwx/,mp=/mnt/nas,ro=1' ; } | tee -a /etc/pve/lxc/LXC_ID.conf - Start the LXC.
Configuring Proxmox to use NAT Networking
By default, Proxmox configures your primary NIC (Network Interface Card) to work in bridged mode. For normal installations, this is the best configuration - VMs and CTs that you create automatically get assigned a DHCP address from your router so can easily access your local network.
In some cases however, bridged networking may be unsuitable (if you are connected to a local network with a low number of free IP addresses) or impossible to use. Many Dedicated Server providers say that you need to purchase a secondary external IP address in order to run Proxmox in bridged mode. With NAT mode you can get away with only using a single external IP address.
Creating the NAT network
Modifying the /etc/network/interfaces file
First, ssh into your Proxmox node and make a copy of the interfaces file as below. We're going to be making significant changes to it, so making a backup will make it easier to revert if something goes wrong:
cp /etc/network/interfaces /etc/network/interfaces.oldThen open /etc/network/interfaces in your preferred text editor:
nano /etc/network/interfacesHere is the standard Proxmox interfaces file - yours will look similar to this, the iface will depend on your hardware (in this example enp2s0) and IP address will be the one set during installation.
auto lo
iface lo inet loopback

iface enp2s0 inet manual

auto vmbr0
iface vmbr0 inet static
	address 192.168.1.253/24
	gateway 192.168.1.1
	bridge_ports enp2s0
	bridge_stp off
	bridge_fd 0
Here is an example of the required interface file for NAT networking. The external IP address definition is moved from vmbr0 to enp2s0, and vmbr0 is renamed to vmbr1. vmbr1 is given an IP address in a different subnet and has bridge-ports set to none. You can use any subnet within the internal IP address space, but make sure it's different to the subnet used in your "external" network. In the below example, my "external" network lies in the 192.168.1.x address space, and I used 10.10.10.x as the NAT subnet.
auto lo
iface lo inet loopback

auto enp2s0
	iface enp2s0 inet static
	address 192.168.1.253/24
	gateway 192.168.1.1

auto vmbr1
	iface vmbr1 inet static
	address 10.10.10.1/24
	bridge-ports none
	bridge-stp off
	bridge-fd 0

pre-up iptables-restore < /etc/iptables.conf
post-up iptables -t nat -A POSTROUTING -s '10.10.10.0/24' -o enp2s0 -j MASQUERADE && iptables -t raw -I PREROUTING -i fwbr+ -j CT --zone 1
pre-down iptables-save > /etc/iptables.conf
post-down iptables -t nat -D POSTROUTING -s '10.10.10.0/24' -o enp2s0 -j MASQUERADE
Enabling IP Forwarding
The post-up and post-down definitions are required to allow VMs and CTs to access the external network. They won't function however without modifying /etc/sysctl.conf - open it in your preferred text editor:
nano /etc/sysctl.confOnce opened, find this line and uncomment it: (net.ipv4.ip_forward=1)
# Uncomment the next line to enable packet forwarding for IPv4
net.ipv4.ip_forward=1
Reboot the Proxmox node
rebootOnce rebooted, create you can start creating VMs or CTs.
Connecting your Virtual Machines and LXC Containers to the NAT network
LXC Containers (CTs)
For LXC Containers, the bridge selected under the Network tab should default to vmbr1. Select Static in the IPv4 section and specify an address within the subnet you chose earlier. Enter vmbr1's IP address in the gateway field.
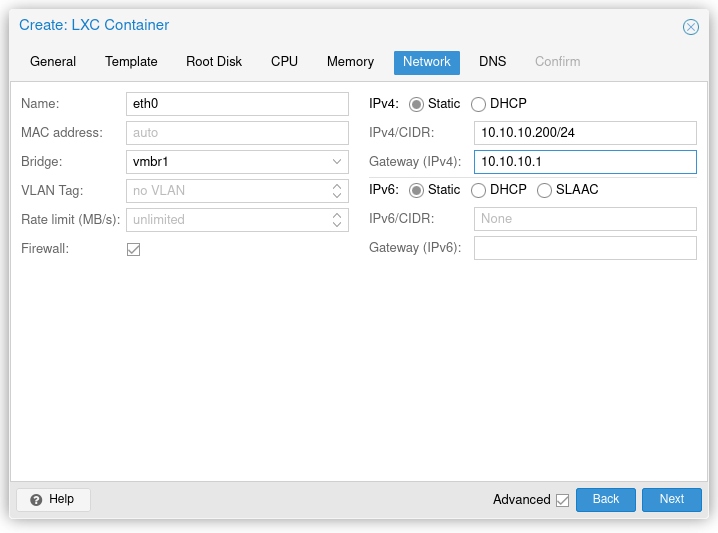
Assuming you configured things correctly, the CT should now have outbound network access! A quick ping will confirm this:
root@Ubuntu-20-04-CT:~# ping google.com
PING google.com (172.217.169.14) 56(84) bytes of data.
64 bytes from lhr25s26-in-f14.1e100.net (172.217.169.14): icmp_seq=1 ttl=115 time=22.7 ms
64 bytes from lhr25s26-in-f14.1e100.net (172.217.169.14): icmp_seq=2 ttl=115 time=22.4 ms
64 bytes from lhr25s26-in-f14.1e100.net (172.217.169.14): icmp_seq=3 ttl=115 time=23.0 ms
64 bytes from lhr25s26-in-f14.1e100.net (172.217.169.14): icmp_seq=4 ttl=115 time=22.9 ms
^C
--- google.com ping statistics ---
4 packets transmitted, 4 received, 0% packet loss, time 3002ms
rtt min/avg/max/mdev = 22.444/22.766/22.992/0.211 ms
QEMU Virtual Machines (VMs)
Proxmox QEMU VMs will also use vmbr1 as their network interface. Unlike containers, the Operating System itself will need to lease it's IP address. Proxmox doesn't contain a DHCP server, so network autoconfiguration will fail:

Fortunately, you can select "Configure network manually" and set a static IP address like we did with the container above. Be aware that Proxmox does not act as a DNS server either, so you will need to change the suggested IP. You can either use the upstream DNS provider (if on a local network) or a public DNS provider e.g. Cloudflare (1.1.1.1), Google (8.8.8.8) or OpenDNS (208.67.222.222). After this is configured, installation should proceed as normal.

Port forwarding to the guests
Our guests are now connected to the internet via a NAT network. Our Proxmox node is acting as the router, allowing packets originating from guests to reach the external hosts. But what about incoming traffic? For this, we must utilise the prerouting function of iptables.
Creating a port forward rule
In this example, we want to forward TCP port 20022 on our Proxmox node to TCP port 22 on 10.10.10.200 (the Ubuntu CT created earlier). 192.168.1.253 is our Proxmox node's "external" IP address:
iptables -t nat -A PREROUTING -d 192.168.1.253/32 -p tcp -m tcp --dport 20022 -j DNAT --to-destination 10.10.10.200:22To do the same but with a restriction on which source IP addresses are allowed, include the -s flag with the allowed address in CIDR format (1.1.1.1/32 is used in this example):
iptables -t nat -A PREROUTING -s 1.1.1.1/32 -d 192.168.1.253/32 -p tcp -m tcp --dport 20022 -j DNAT --to-destination 10.10.10.200:22TCP ports 22 (SSH) and 8006 (HTTPS) are used for managing Proxmox. If you specify either of these ports as the "external" port, you will risk losing access to your node! Proxmox's SSH port can be changed, but the HTTPS port is fixed.
Testing TCP port forwards with telnet
In the above example, we forwarded a TCP port. Telnet is great for quickly testing whether TCP ports are open. To test a port, enter telnet followed by the IP address or hostname, followed by the port number:
telnet 192.168.1.253 20022If the port forward is working as intended, you should see an output similar to this:
Trying 192.168.1.253...
Connected to 192.168.1.253.
Escape character is '^]'.
SSH-2.0-OpenSSH_8.2p1 Ubuntu-4
Listing active port forwards
After adding the iptables rule, list all prerouting rules:
iptables -t nat -v -L PREROUTING -n --line-numberRunning this command should provide an output similar to below:
Chain PREROUTING (policy ACCEPT 11 packets, 592 bytes)
num   pkts bytes target     prot opt in     out     source               destination
1        0     0 DNAT       tcp  --  *      *       0.0.0.0/0            192.168.1.253        tcp dpt:20022 to:10.10.10.200:22
Deleting a port forward rule
Removing iptables prerouting rules is very simple. Instead of -A (Add), we will use -D (Delete). Specify a line number from the previous output (1 is used in this example):
iptables -t nat -D PREROUTING 1Then, list all of the rules again - this will confirm that it has been removed:
root@pve:~# iptables -t nat -v -L PREROUTING -n --line-number
Chain PREROUTING (policy ACCEPT 0 packets, 0 bytes)
num   pkts bytes target     prot opt in     out     source               destination
Resizing (or removing) Local-LVM
When installing Proxmox to an ext4 volume, the installer assigns the majority of your boot disk to "Local-LVM". This may not be desirable if you plan on using a secondary disk for VM storage, and would like to store more ISO images and backups in the root volume (known in Proxmox as "Local").
First, run lvdisplay (Logical Volume display) as root to check the current layout:
root@pve:~# lvdisplay
  --- Logical volume ---
  LV Path                /dev/pve/swap
  LV Name                swap
  VG Name                pve
  LV UUID                DkDV6A-7iqo-70kO-i9Gx-d9qo-XaCu-VUCAYb
  LV Write Access        read/write
  LV Creation host, time proxmox, 2021-03-13 22:40:36 +0000
  LV Status              available
  # open                 2
  LV Size                8.00 GiB
  Current LE             2048
  Segments               1
  Allocation             inherit
  Read ahead sectors     auto
  - currently set to     256
  Block device           253:0

  --- Logical volume ---
  LV Path                /dev/pve/root
  LV Name                root
  VG Name                pve
  LV UUID                pqcv3c-Csis-fBqQ-ARkb-3xzo-7xau-DaRzxT
  LV Write Access        read/write
  LV Creation host, time proxmox, 2021-03-13 22:40:37 +0000
  LV Status              available
  # open                 1
  LV Size                58.00 GiB
  Current LE             14848
  Segments               1
  Allocation             inherit
  Read ahead sectors     auto
  - currently set to     256
  Block device           253:1

  --- Logical volume ---
  LV Name                data
  VG Name                pve
  LV UUID                tyoWtm-fyEr-PqRg-5Sn2-dcTq-tE69-qKHprl
  LV Write Access        read/write
  LV Creation host, time proxmox, 2021-03-13 22:40:37 +0000
  LV Pool metadata       data_tmeta
  LV Pool data           data_tdata
  LV Status              available
  # open                 0
  LV Size                <147.38 GiB
  Allocated pool data    0.00%
  Allocated metadata     1.08%
  Current LE             37728
  Segments               1
  Allocation             inherit
  Read ahead sectors     auto
  - currently set to     256
  Block device           253:4
Based on the above output, we see that pve-data (local-lvm in the Proxmox GUI) is almost 3 times the size of the root volume. To resize this, you will first need to remove it. This will delete all contents of local-lvm, so please back up any virtual machines and remove them first so you don't lose anything!
root@pve:~# lvremove /dev/pve/data -y
  Logical volume "data" successfully removed
Optional - If you still require a local-lvm partition (but want to give it less space) you can recreate it with the following command (in this example, 40G is specified to give it 40 Gibibytes).
root@pve:~# lvcreate -L 40G -n data pve -T
  Thin pool volume with chunk size 64.00 KiB can address at most 15.81 TiB of data.
  Logical volume "data" created.
The logical volume for root can then be resized to give it all available free space:
root@pve:~# lvresize -l +100%FREE /dev/pve/root
  Size of logical volume pve/root changed from 58.00 GiB (14848 extents) to 224.38 GiB (57442 extents).
  Logical volume pve/root successfully resized.
Once the logical volume has been resized, the ext4 partition must also be resized using resize2fs:
root@pve:~# resize2fs /dev/mapper/pve-root
resize2fs 1.44.5 (15-Dec-2018)
Filesystem at /dev/mapper/pve-root is mounted on /; on-line resizing required
old_desc_blocks = 8, new_desc_blocks = 29
The filesystem on /dev/mapper/pve-root is now 58820608 (4k) blocks long.
Once resized, run lvdisplay again to verify the changes have taken effect.
root@pve:~# lvdisplay
--- Logical volume ---
LV Path /dev/pve/swap
LV Name swap
VG Name pve
LV UUID DkDV6A-7iqo-70kO-i9Gx-d9qo-XaCu-VUCAYb
LV Write Access read/write
LV Creation host, time proxmox, 2021-03-13 22:40:36 +0000
LV Status available
# open 2
LV Size 8.00 GiB
Current LE 2048
Segments 1
Allocation inherit
Read ahead sectors auto
- currently set to 256
Block device 253:0
--- Logical volume ---
LV Path /dev/pve/root
LV Name root
VG Name pve
LV UUID pqcv3c-Csis-fBqQ-ARkb-3xzo-7xau-DaRzxT
LV Write Access read/write
LV Creation host, time proxmox, 2021-03-13 22:40:37 +0000
LV Status available
# open 1
LV Size 224.38 GiB
Current LE 57442
Segments 1
Allocation inherit
Read ahead sectors auto
- currently set to 256
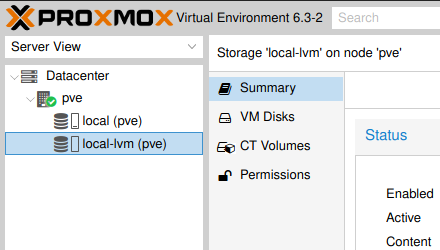
Block device 253:1Then, log into the Proxmox GUI and go to Datacenter > Storage and remove the local-lvm entry:

Proxmox GPU passthrough for Jellyfin LXC with NVIDIA Graphics card (GTX1050 ti)
In the terminal of the Proxmox host:
-
Install gcc with
apt install gcc -
Install build-essential with
apt install build-essential -
Reboot the machine
-
Install the pve-headers with
apt install pve-headers-$(uname -r) -
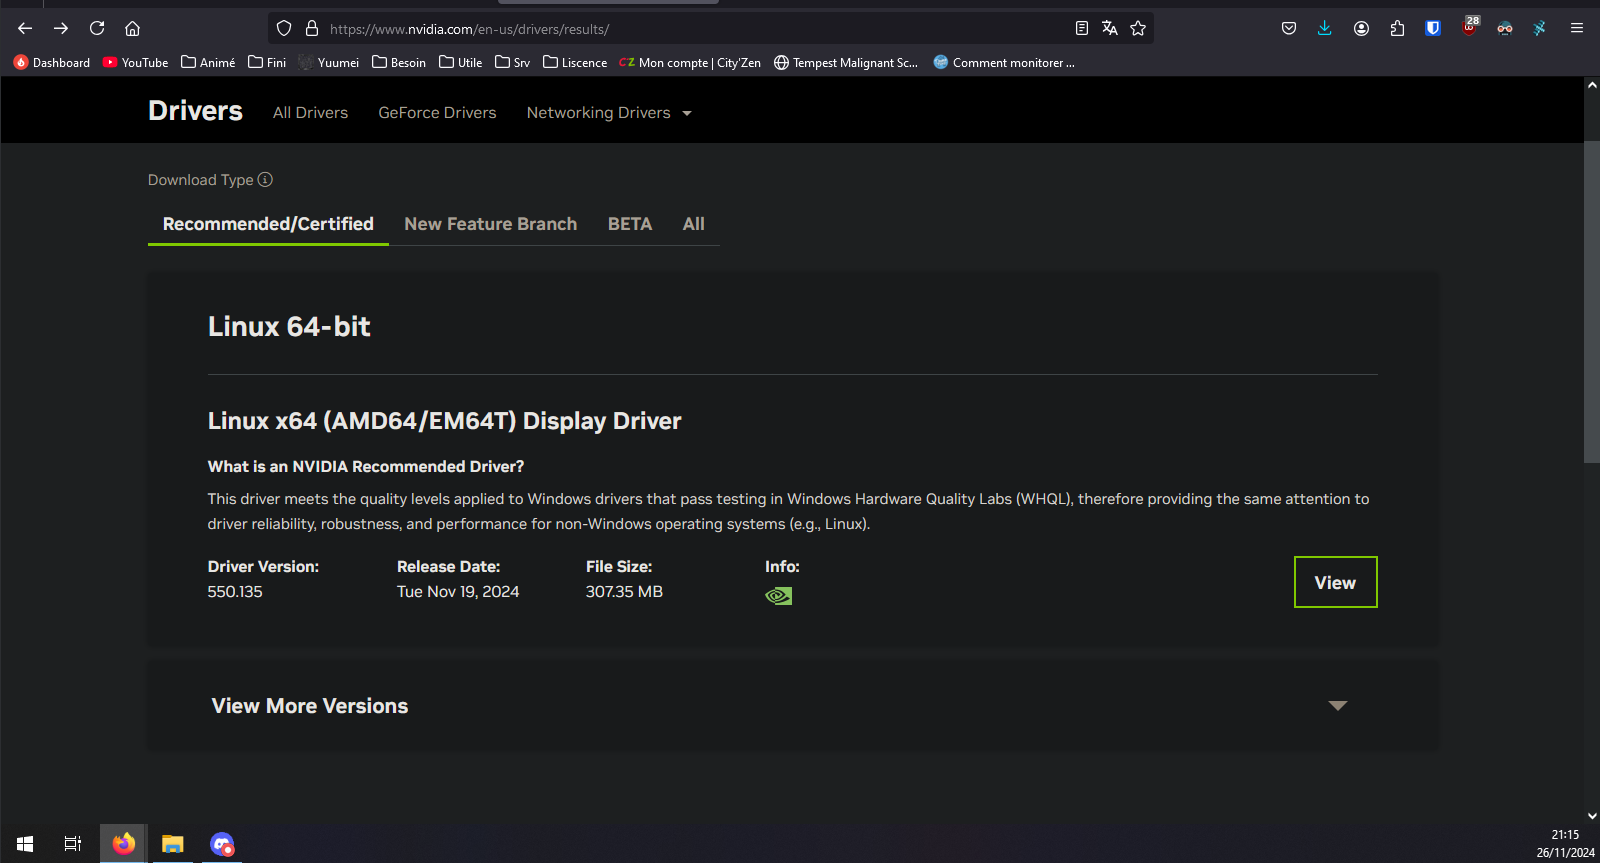
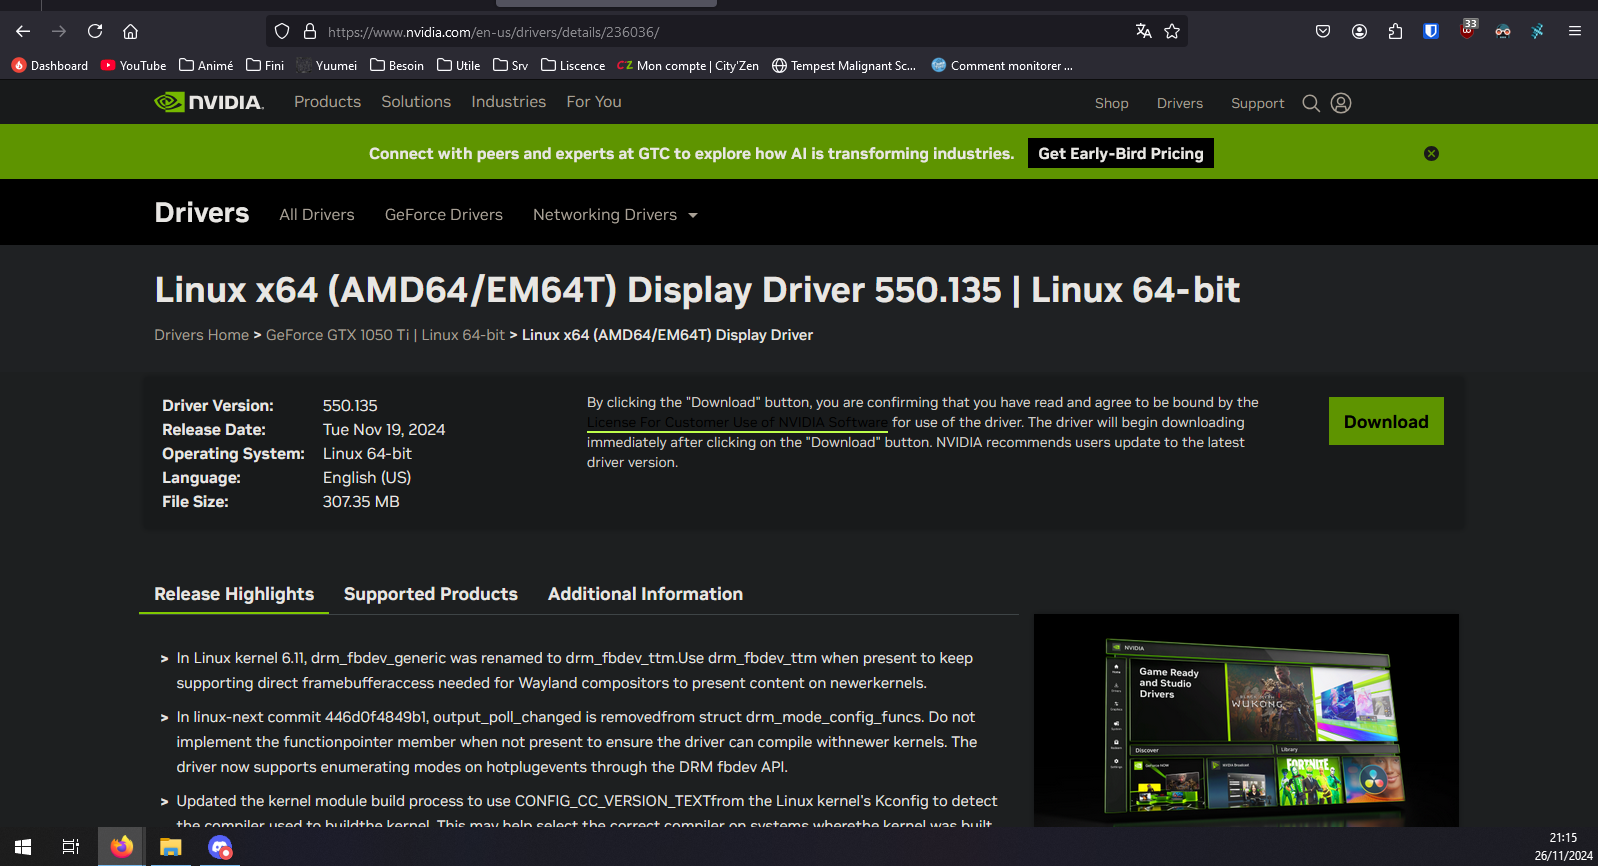
Install the nvidia driver from the official page https://www.nvidia.com/download/index.aspx :

-
Download the file in your Proxmox host with
wget [link you copied],in my casewget https://us.download.nvidia.com/XFree86/Linux-x86_64/550.76/NVIDIA-Linux-x86_64-550.76.run -
Also copy the link into a text file, as we will need the exact same link later again. (For the GPU passthrough to work, the drivers in Proxmox and inside the lxc need to match, so it is vital, that we download the same file on both)
-
After the download finished, run
ls, to see the downloades file, in my case it listedNVIDIA-Linux-x86_64-550.76.run. Mark the filename and copy it -
Now execute the file with
sh [filename](in my casesh NVIDIA-Linux-x86_64-550.76.run) and go through the installer. There should be no issues. When asked about the x-configuration file, I accepted. You can also ignore the error about the 32-bit part missing. -
Reboot the machine
-
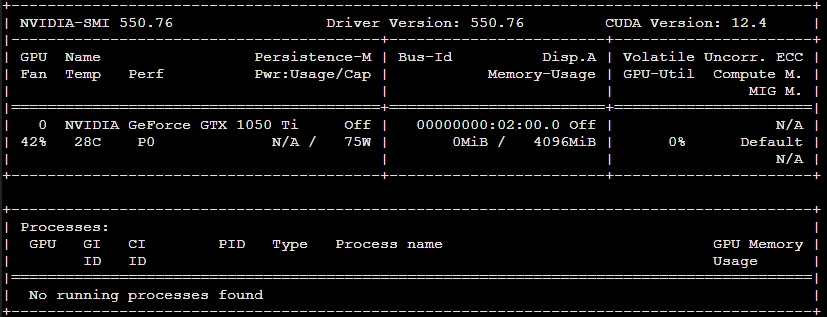
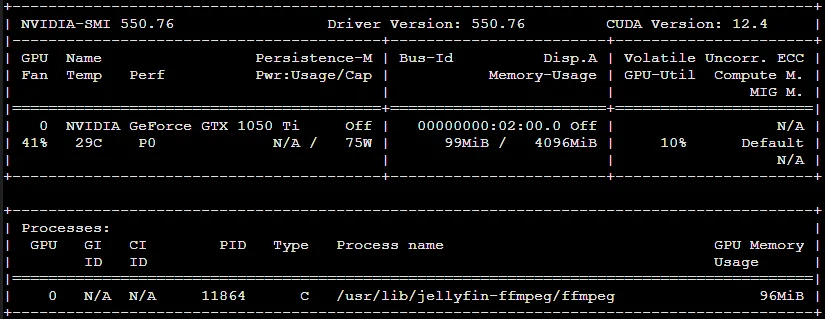
Run
nvidia-smi, to verify the installation - if you get the box shown below, everything worked so far:
-
Create a new Debian 12 lxc for Jellyfin to run in, note the container ID (CT ID), as we will need it later.
script for auto jellyfin install :
bash -c "$(wget -qLO - https://github.com/community-scripts/ProxmoxVE/raw/main/ct/jellyfin.sh)" -
Start the lxc and log into the console, now run
apt update && apt full-upgrade -yto update the system -
assign a static IP address to the lxc in your internet router. If you do not do that, all connected devices may loose contact to the Jellyfin host, if the IP address changes at some point.
-
Reboot the lxc, to make sure all updates are applied and if you configured one, the new static IP address is applied. (You can check the IP address with the command
ip a) - Shutdown the lxc
-
Now switch back to the Proxmox servers main console
-
Run
ls -l /dev/nvidia*to view all the nvidia devices:
crw-rw-rw- 1 root root 195,   0 Apr 18 19:36 /dev/nvidia0
crw-rw-rw- 1 root root 195, 255 Apr 18 19:36 /dev/nvidiactl
crw-rw-rw- 1 root root 235,   0 Apr 18 19:36 /dev/nvidia-uvm
crw-rw-rw- 1 root root 235,   1 Apr 18 19:36 /dev/nvidia-uvm-tools

/dev/nvidia-caps:
total 0
cr-------- 1 root root 238, 1 Apr 18 19:36 nvidia-cap1
cr--r--r-- 1 root root 238, 2 Apr 18 19:36 nvidia-cap2
-
Copy the output of the previus command (
ls -l /dev/nv*) into a text file, as we will need the information in further steps. Also take note, that all the nvidia devices are assigned toroot root. Now we know, that we need to route the root group and the corresponding devices to the lxc. -
Run
cat /etc/groupto look through all the groups and find root. In my case (as it should be) root is right at the top:
root:x:0:
-
Run
nano /etc/subgidto add a new mapping to the file, to allow root to map those groups to a new group ID in the following process, by adding a line to the file:root:X:1, with X being the number of the group we need to map (in my case 0). My file ended up looking like this:
root:100000:65536
root:0:1
-
Run
cd /etc/pve/lxcto get into the folder for editing the container config file (and optionally runlsto view all the files) -
Run
nano X.confwith X being the lxc ID (in my casenano 500.conf) to edit the corresponding containers configuration file. Before any of the further changes, my file looked like this:
arch: amd64
cores: 4
features: nesting=1
hostname: Jellyfin
memory: 2048
mp0: /HDD_1/media,mp=/mnt/media
net0: name=eth0,bridge=vmbr1,firewall=1,hwaddr=BC:24:11:57:90:B4,ip=dhcp,ip6=auto,type=veth
ostype: debian
rootfs: NVME_1:subvol-500-disk-0,size=12G
swap: 2048
unprivileged: 1
-
Now we will edit this file to pass the relevant devices through to the container
-
Underneath the previously shown lines, add the following line for every device we need to pass through. Use the text you copied previously for refference, as we will need to use the corresponding numbers here for all the devices we need to pass through. I suggest working your way through from top to bottom. For example to pass through my first device called "/dev/nvidia0" (at the end of each line, you can see which device it is), I need to look at the first line of my copied text:
crw-rw-rw- 1 root root 195, 0 Apr 18 19:36 /dev/nvidia0
Right now, for each device only the two numbers listed after "root" are relevant, in my case 195 and 0. For each device, add a line to the containers config file, following this pattern:lxc.cgroup2.devices.allow: c [first number]:[second number] rwm
So in my case, I get these lines:
-
lxc.cgroup2.devices.allow: c 195:0 rwm
lxc.cgroup2.devices.allow: c 195:255 rwm
lxc.cgroup2.devices.allow: c 235:0 rwm
lxc.cgroup2.devices.allow: c 235:1 rwm
lxc.cgroup2.devices.allow: c 238:1 rwm
lxc.cgroup2.devices.allow: c 238:2 rwm
-
Now underneath, we also need to add a line for every device, to be mounted, following the pattern (note not to forget adding each device twice into the line)
lxc.mount.entry: [device] [device] none bind,optional,create=file
In my case this results in the following lines (if your device s are the same, just copy the text for simplicity):
lxc.mount.entry: /dev/nvidia0 dev/nvidia0 none bind,optional,create=file
lxc.mount.entry: /dev/nvidiactl dev/nvidiactl none bind,optional,create=file
lxc.mount.entry: /dev/nvidia-uvm dev/nvidia-uvm none bind,optional,create=file
lxc.mount.entry: /dev/nvidia-uvm-tools dev/nvidia-uvm-tools none bind,optional,create=file
lxc.mount.entry: /dev/nvidia-caps/nvidia-cap1 dev/nvidia-caps/nvidia-cap1 none bind,optional,create=file
lxc.mount.entry: /dev/nvidia-caps/nvidia-cap2 dev/nvidia-caps/nvidia-cap2 none bind,optional,create=file
-
underneath, add the following lines, to map the previously enabled group to the container:
lxc.idmap: u 0 100000 65536
-
to map the group ID 0 (root group in the Proxmox host, the owner of the devices we passed through) to be the same in both namespaces:
lxc.idmap: g 0 0 1
-
to map all the following group IDs (1 to 65536) in the Proxmox Host to the containers namespace (group IDs 100000 to 65535):
lxc.idmap: g 1 100000 65536
-
In the end, the lxc configuration file looked like this:
arch: amd64
cores: 4
features: nesting=1
hostname: Jellyfin
memory: 2048
mp0: /HDD_1/media,mp=/mnt/media
net0: name=eth0,bridge=vmbr1,firewall=1,hwaddr=BC:24:11:57:90:B4,ip=dhcp,ip6=auto,typ>
ostype: debian
rootfs: NVME_1:subvol-500-disk-0,size=12G
swap: 2048
unprivileged: 1
lxc.cgroup2.devices.allow: c 195:0 rwm
lxc.cgroup2.devices.allow: c 195:255 rwm
lxc.cgroup2.devices.allow: c 235:0 rwm
lxc.cgroup2.devices.allow: c 235:1 rwm
lxc.cgroup2.devices.allow: c 238:1 rwm
lxc.cgroup2.devices.allow: c 238:2 rwm
lxc.mount.entry: /dev/nvidia0 dev/nvidia0 none bind,optional,create=file
lxc.mount.entry: /dev/nvidiactl dev/nvidiactl none bind,optional,create=file
lxc.mount.entry: /dev/nvidia-uvm dev/nvidia-uvm none bind,optional,create=file
lxc.mount.entry: /dev/nvidia-uvm-tools dev/nvidia-uvm-tools none bind,optional,create>
lxc.mount.entry: /dev/nvidia-caps/nvidia-cap1 dev/nvidia-caps/nvidia-cap1 none bind,o>
lxc.mount.entry: /dev/nvidia-caps/nvidia-cap2 dev/nvidia-caps/nvidia-cap2 none bind,o>
lxc.idmap: u 0 100000 65536
lxc.idmap: g 0 0 1
lxc.idmap: g 1 100000 65536
-
Now start the lxc. If the lxc does not start correctly, check the lxc configuration file again, because you may have made a misake while adding the new lines.
-
Go into the lxc console and download the same nvidia driver file, as done previously in the Proxmox host (
wget [link you copied]), using the link you copied before-
Run
ls, to see the file you downloaded and copy the file name -
Execute the file, but now add the --no-kernel-module flag. Because the host shares its kernel with the container, the files are already installed. Leaving this flag out, will cause an error:
sh [filename] --no-kernel-module
in my casesh NVIDIA-Linux-x86_64-550.76.run --no-kernel-module
Run the installer the same way, as before. You can again ignore the X-driver error and the 32 bit error. Take note of the vulkan loader error. I don't know if the package is actually necessary, so I installed it, just to be safe. For the current debian 12 distro, libvulkan1 is the right one:apt install libvulkan1
-
-
Reboot the whole Proxmox server
-
Run
nvidia-smiinside the lxc console. You should now get the familiar box again. If there is an error message, something went wrong (see possible mistakes below)
-
Go into the Jellyfin Dashboard and into the settings. Under Playback, select Nvidia NVENC vor video transcoding and select the appropriate transcoding methods (see the matrix under "Decoding" on https://developer.nvidia.com/video-encode-and-decode-gpu-support-matrix-new for refference)
In my case, I used the following options, although I have not tested the system completely for stability:
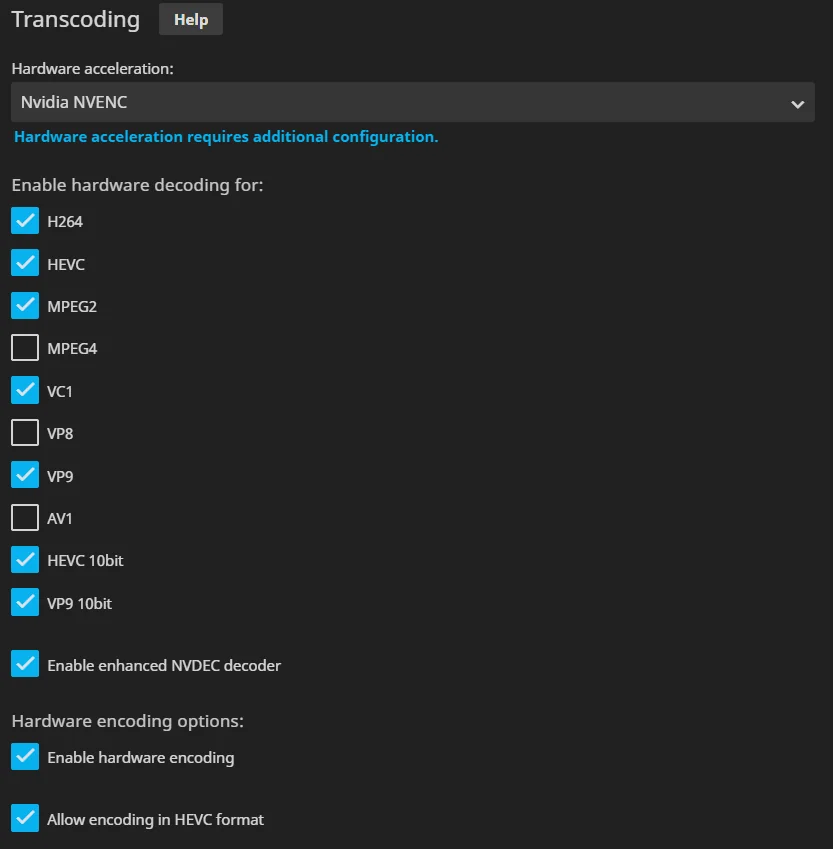
-
Save these settings with the "Save" button at the bottom of the page
-
Start a Movie on the Jellyfin web-GUI and select a non native quality (just try a few)
-
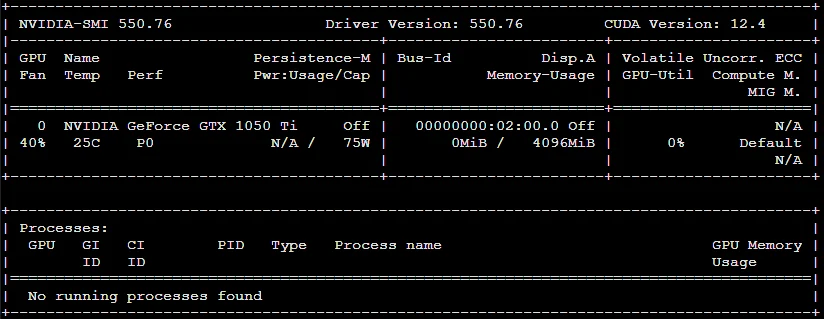
While the movie is running in the background, open the Proxmox host shell and run
nvidia-smi
If everything works, you should see the process running at the bottom (it will only be visible in the Proxmox host and not the jellyfin container):
-
OPTIONAL: a way to disable the cap for the maximum encoding streams (https://forum.proxmox.com/threads/jellyfin-lxc-with-nvidia-gpu-transcoding-and-network-storage.138873/ see " The final step: Unlimited encoding streams").
-
First in the Proxmox host shell:
-
Run
cd /opt/nvidia -
Run
wgethttps://raw.githubusercontent.com/keylase/nvidia-patch/master/patch.sh -
Run
bash ./patch.sh
-
-
Then, in the Jellyfin container console:
-
Run
mkdir /opt/nvidia -
Run
cd /opt/nvidia -
Run
wgethttps://raw.githubusercontent.com/keylase/nvidia-patch/master/patch.sh -
Run
bash ./patch.sh
-
-
Afterwards I rebooted the whole server
-
Installer Windows sous Proxmox
Pour installer Windows sous Proxmox il faut d'abord télécharger :
Windows Server / 10 -11 : https://www.microsoft.com/fr-fr/evalcenter/evaluate-windows-server
Les drivers de virtualisation soutenu par Fedora : https://fedorapeople.org/groups/virt/virtio-win/direct-downloads/archive-virtio/
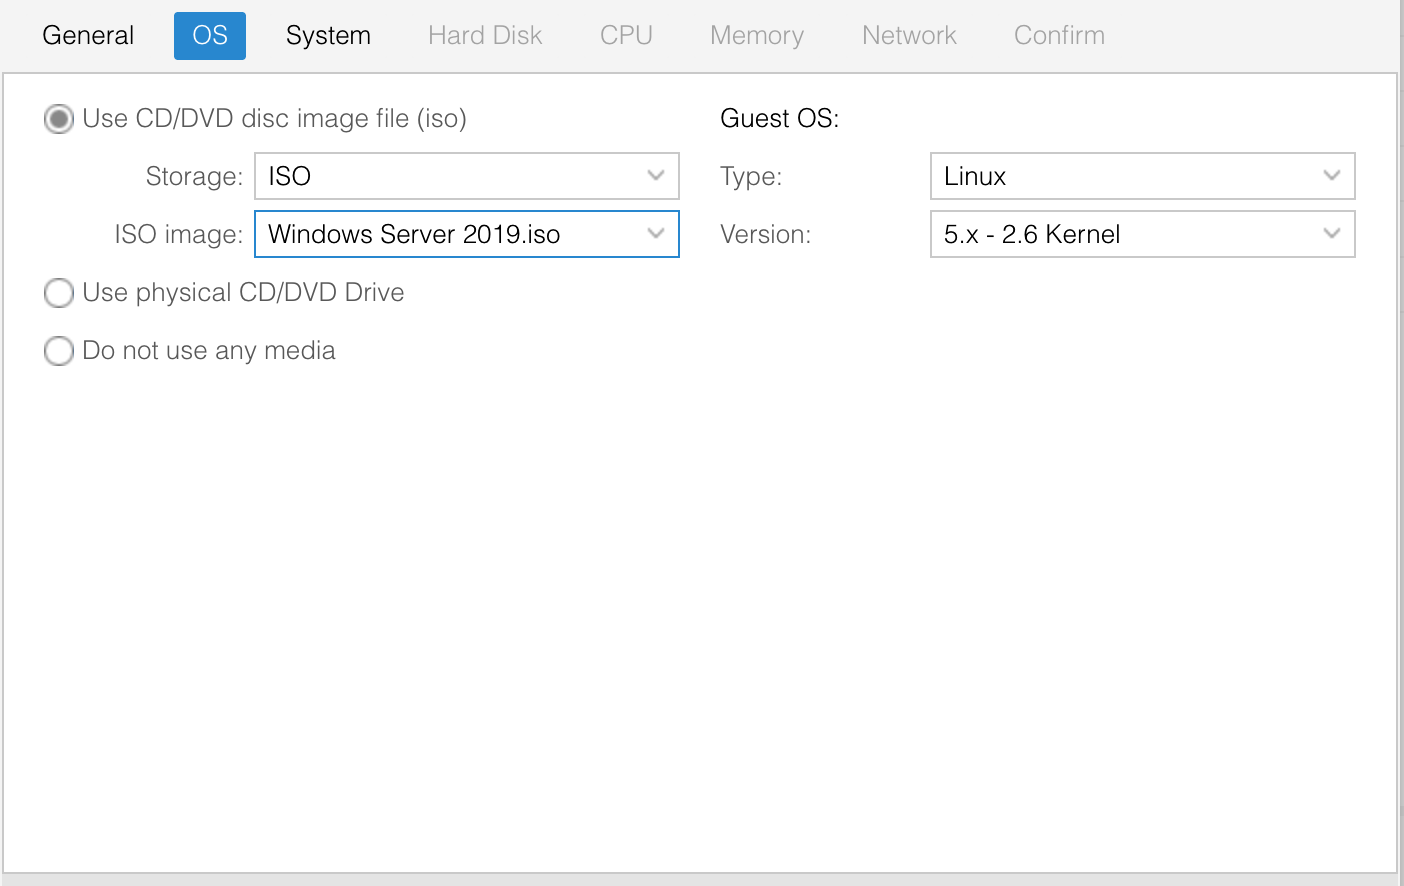
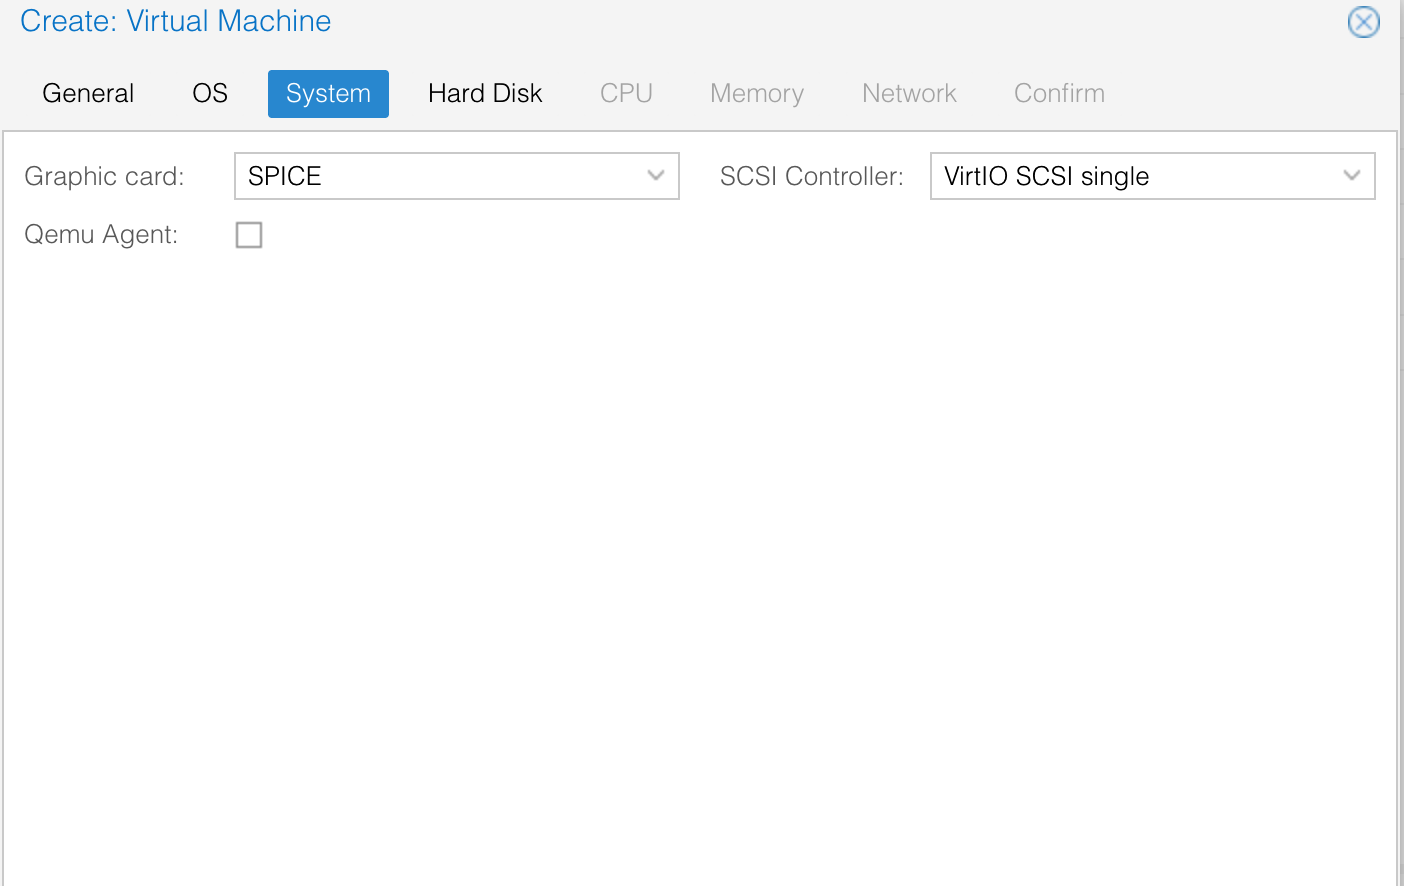
Dans la création de la VM -> System, Il vaut mieux utiliser en Graphic card : Spice et en SCSI Controller : VirtIO SCSI Single.
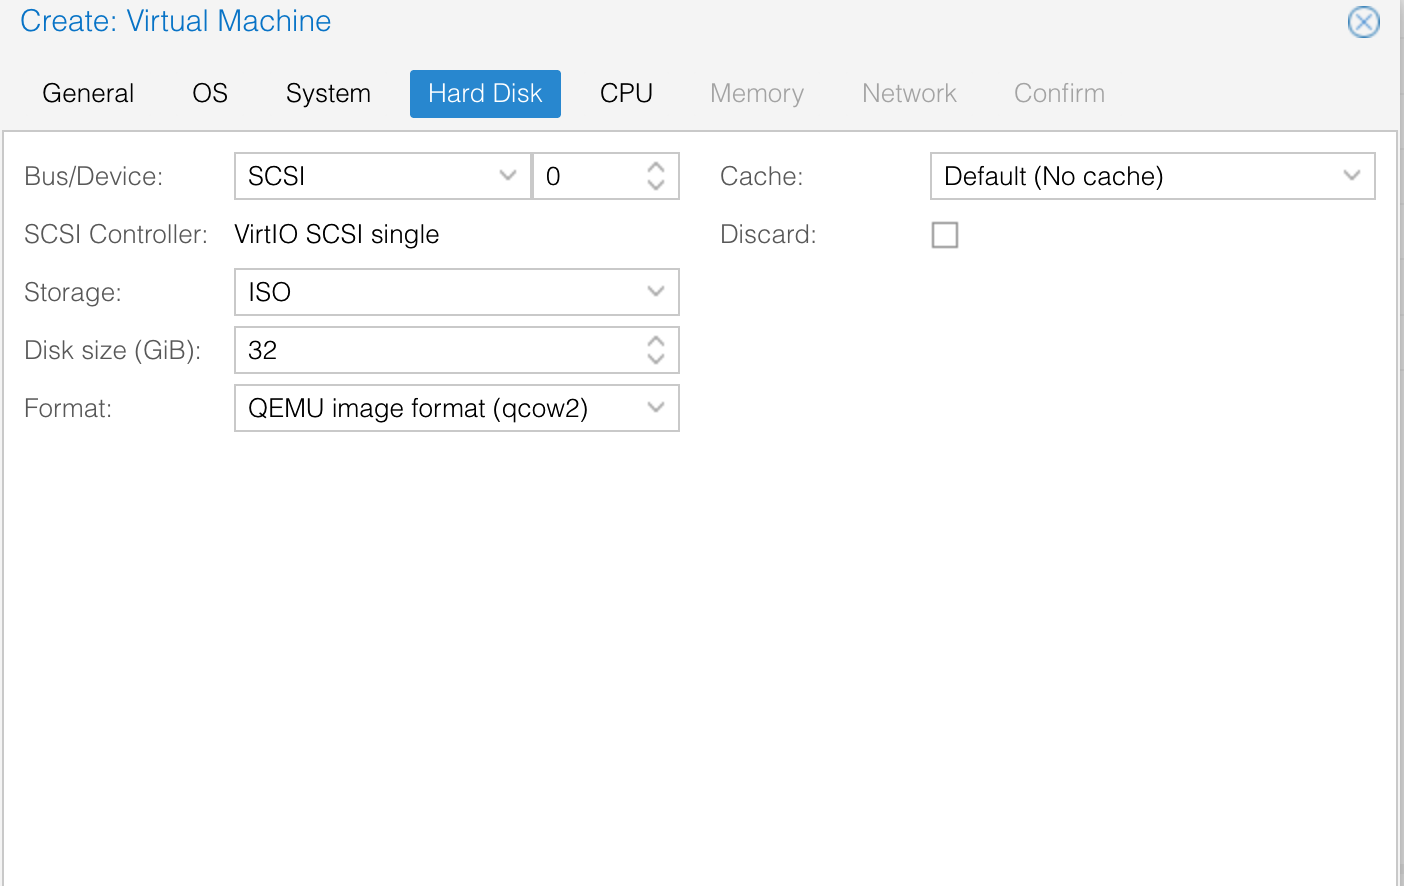
Dans Hard Disk, Bus Device prendre le SCSI.
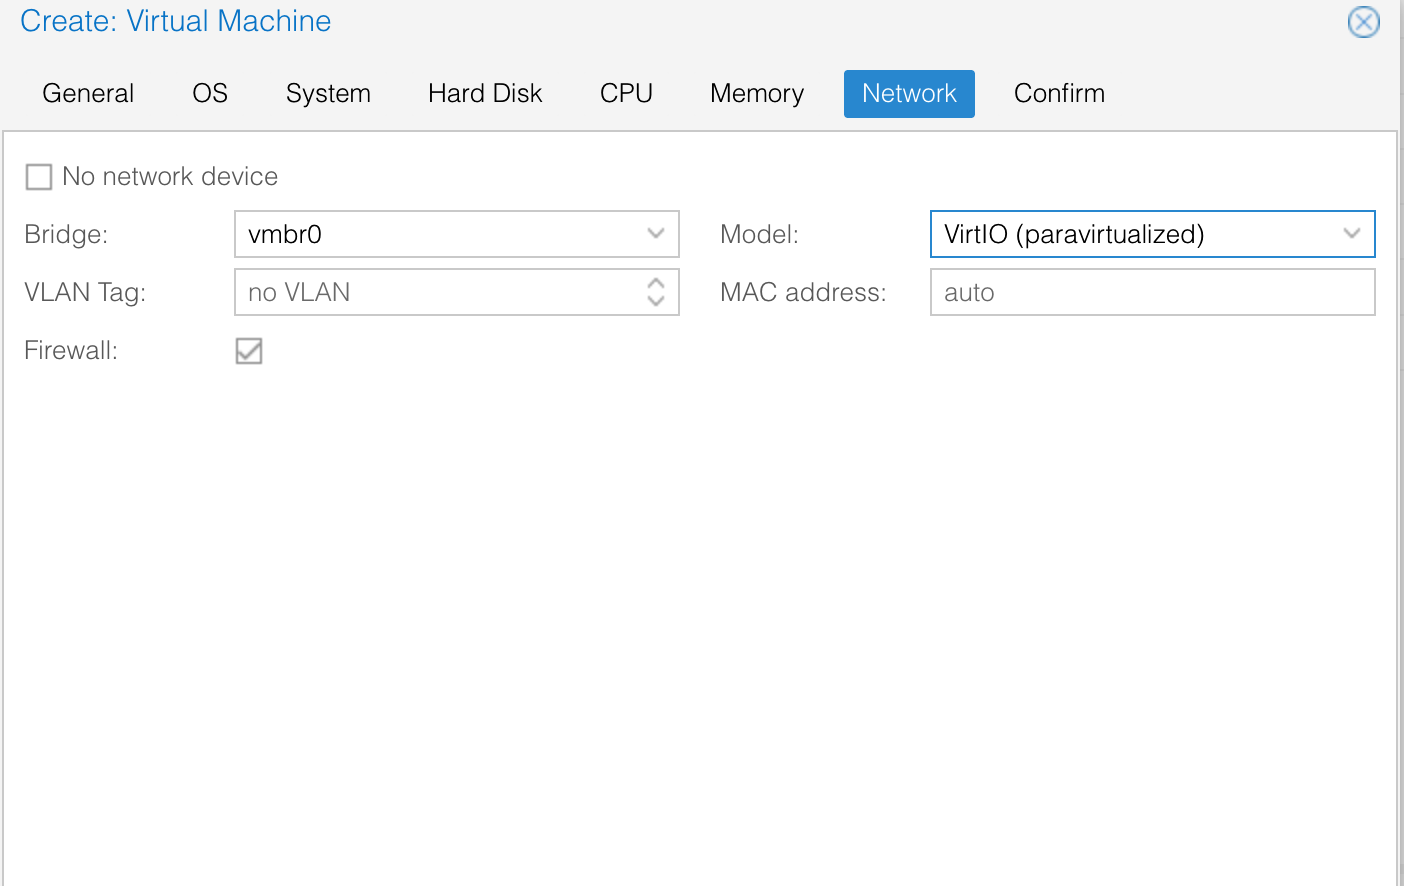
Dans Network prendre le model de VirtIO
On peut ensuite Terminer la configuration de la VM normalement (ne pas oublier de mettre un peu de cœur etc... )
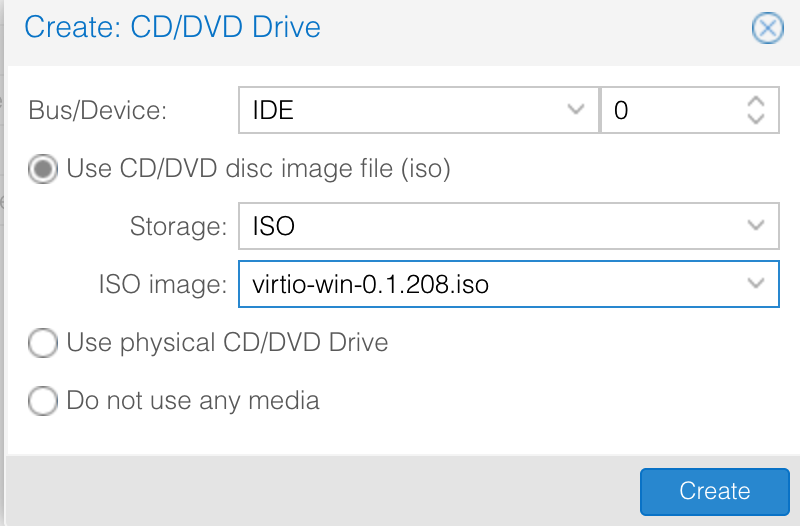
On crée un nouveau CD/DVD et mettre l'iso des Pilotes de Virtualisation.
On démarre la machine, on choisi sa langue, sa version de Windows, on accepte les CLUF de Microsoft, et la nous ne trouvons aucun disque (Héhé).
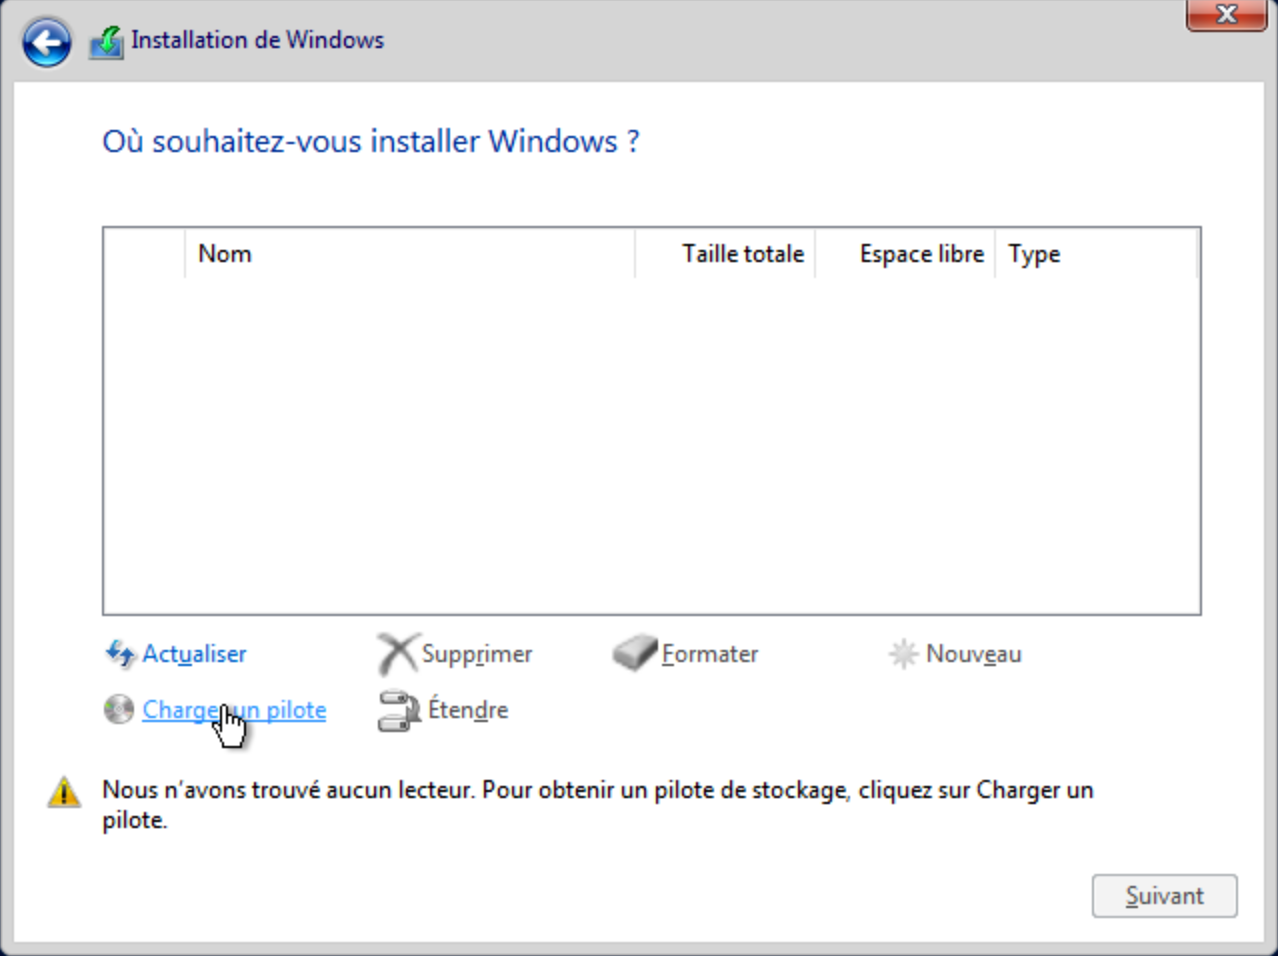
On clique alors sur Charger un pilote puis sur Rechercher.
Il trouve alors les Drivers nécessaire. On prend le driver 2019 (Si on a pris un Windows Server 2019) et on installe Windows.
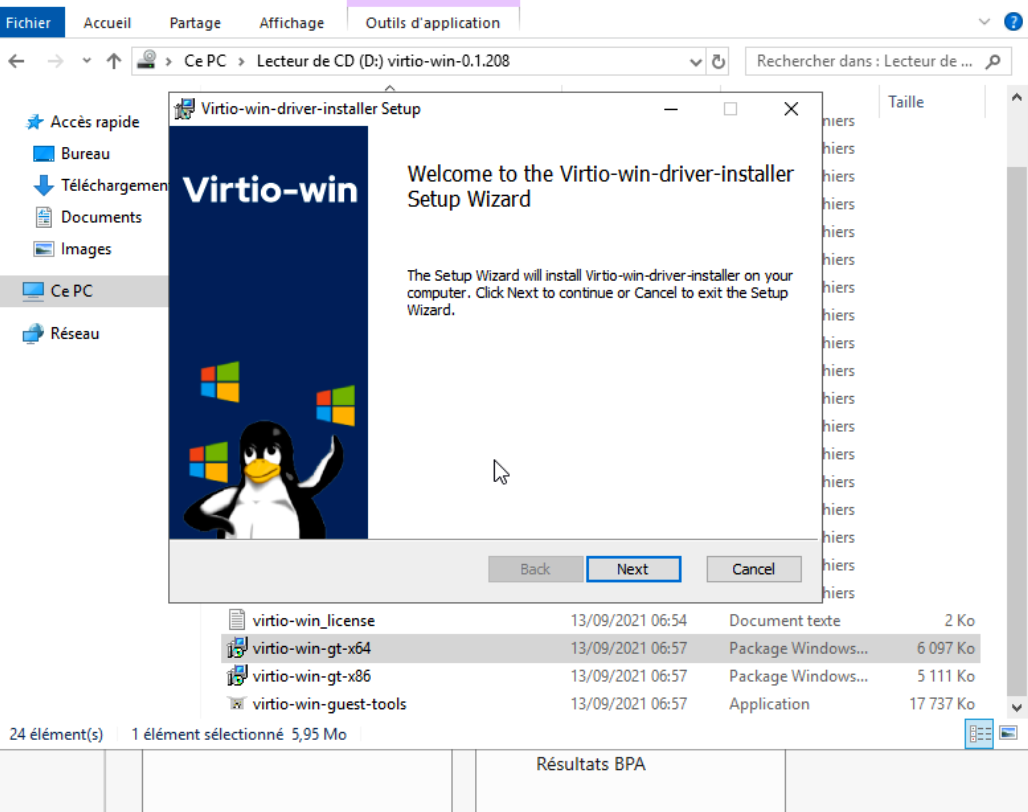
Une fois sur Windows on installe les pilotes qui ce trouve dans le l'ISO de VirtIO, VirtIO-win-gt-x64 ou x86 qui correspond à notre système d'exploitation puis VirtIO-win-guest-tools.
On peut ensuite ce connecter avec notre Console Spice.
Bugs & Fixs
Docker : corriger l’erreur “permission denied” sur sysctl net.ipv4.ip_unprivileged_port_start
Dans ce tutoriel, je vais vous expliquer comment résoudre l’erreur suivante sur hôte Docker qui fonctionne sur Proxmox en LXC.
Lors du démarrage de vos conteneurs Docker, vous avez l’erreur suivante :
Error response from daemon: failed to create task for container: failed to create shim task: OCI runtime create failed: runc create failed: unable to start container process: error during container init: open sysctl net.ipv4.ip_unprivileged_port_start file: reopen fd 8: permission denied: unknown
Cette erreur est apparue avec la version 1.7.28-2 du paquet containerd.io.
Pour résoudre, ce problème, il faut downgrade à la version : 1.7.28-1.
Commencer par afficher la liste des versions disponibles :
apt list -a containerd.io
Installer l’ancienne version :
apt install containerd.io=1.7.28-1~ubuntu.24.04~noble
Adapter la commande à votre système d’explotation
Une fois installée, bloquer la version du paquet containerd.io.
apt-mark hold containerd.io
Vous pouvez maintenant redémarrer vos conteneurs Docker.
C’est un solution temporaire, le temps que le bug soit corrigé.
Pour suivre l’évolution :