
How to Install and Configure CrowdSec on OPNsense
CrowdSec is an open source Intrusion Prevention System (IPS) which crowd sources various types of threat intelligence that is used to monitor and protect your network from known threats. One unique aspect of CrowdSec is the use of crowd sourcing threat information that is shared among other CrowdSec users. This allows CrowdSec to respond quickly to new threats. CrowdSec can monitor, alert, and block malicious activity on any system in your network in which CrowdSec is installed. While other IPS platforms may use various signatures/rules to block traffic that is known to be malicious, CrowdSec takes the approach of calculating a reputation score for IP addresses using threat intelligence gathered by the community. IP addresses with a bad reputation score can be blocked from accessing protected resources. This makes CrowdSec fast, efficient, and effective for protecting various resources on your network.
There are two main parts to CrowdSec: the agent and the bouncer. The agents monitor log files for malicious activity and reports certain information back to the CrowdSec community. The bouncer is used to block IP addresses from access protected resources. If the bouncer is running on the firewall like OPNsense, it will protect the entire network from malicious IP addresses, but bouncers can protect individual services running on your network such as web servers. The CrowdSec agents and bouncers communicate with the local API (LAPI) which then communicates with the central API (CAPI) to share and update crowd-sourced intelligence information. The LAPI can be located on the firewall or some other server on the network. In a more advanced CrowdSec installation, it possible to run multiple CrowdSec agents and bouncers on your network that report to a single local server hosting the CrowdSec LAPI.
CrowdSec released a beta version of the CrowdSec OPNsense plugin on January 21st, 2022, but it is currently available in the main OPNsense repository. This guide will describe how to configure a basic CrowdSec installation.
What about the Intrusion Detection that comes with OPNsense?
You may wonder how CrowdSec is different from the Intrusion Detection that is shipped with OPNsense. The Intrusion Detection feature in OPNsense uses Suricata. The rulesets in Suricata are curated by industry experts to block specific activity known to be malicious. One thing to keep in mind is the free lists in Suricata are at least 30 days old so they will not contain the latest threats. You may sign up for a free up-to-date list of rules for Suricata in exchange for sending telemetry data from your network. Another consideration for the built-in intrusion detection, is that you have to choose which rules are enabled/disabled by default for each ruleset. You may need to periodically review the rules to ensure you have everything you need enabled or disabled. If you do not have a very powerful firewall, Suricata can eat into resources pretty quickly if you enable a bunch of rules and have a lot of network traffic to analyze. Suricata is multi-threaded which helps increase performance, but you still need to have some hardware resources available to process all of the rules.
CrowdSec gathers threat intelligence from the community and distributes this information quickly to block malicious threats. You do not have to worry about enabling or disabling various rules or rulesets (but you can install various scenarios you wish to monitor). Performance should be great since the firewall is simply blocking a list of known malicious IPs (via a CrowdSec bouncer) rather than processing a bunch of rules for the traffic generated by every IP hitting your firewall. Another nice aspect about CrowdSec is that malicious activity monitored by CrowdSec agents contribute to the crowd sourced intelligence gathered across the world. I love the idea of being an active participant in the contribution of important intelligence information for the benefit of the Infosec community.
Important Things to Know
While CrowdSec will protect your entire network from known malicious IPs gathered by community if you set up the appropriate block rule(s) as described later in this guide, the plugin currently only monitors for specific malicious activity on the web interface and the SSH services running on OPNsense. If additional log file parsers are created for CrowdSec plugin, it will be able to monitor other services running on your OPNsense router. This is an area where community contributions to the development of CrowdSec will be very beneficial to OPNsense users.
The most basic installation of the CrowdSec plugin operates in a single server configuration meaning that it will only protect services on your OPNsense system as well as blocking malicious IP addresses that are curated from the CrowdSec community. However, CrowdSec may be set up in a multi-server configuration where you have multiple CrowdSec agents reporting to a single local API server. The local API server may be run on the OPNsense machine, but if you have limited hardware resources and you are parsing a lot of logs on your network, offloading the local API server onto another machine may help reduce the burden on your OPNsense firewall.
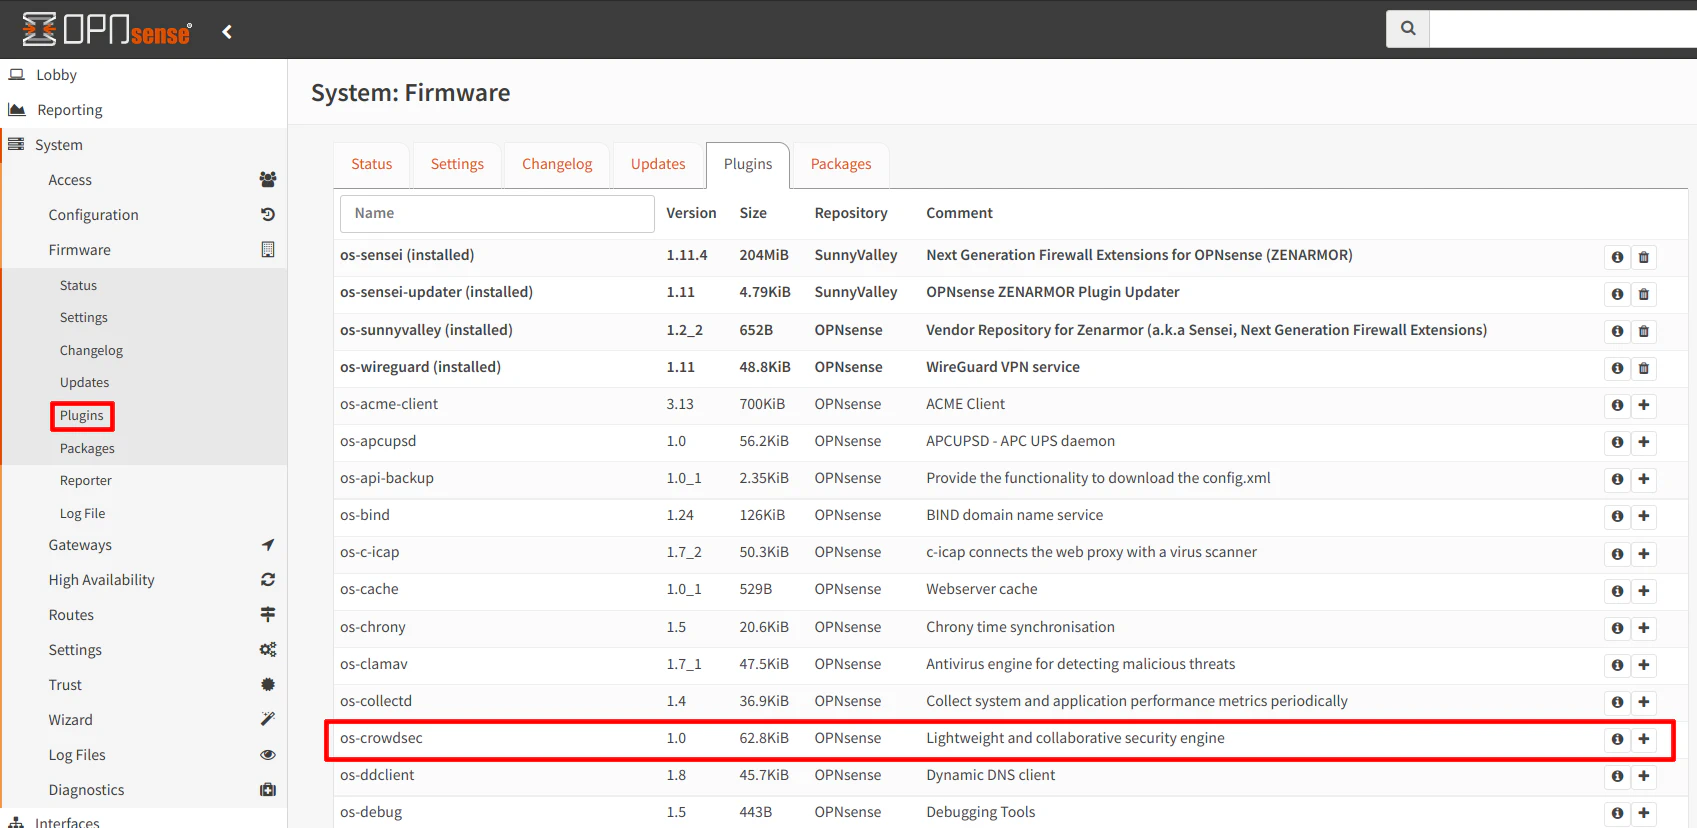
Install CrowdSec
Go to the “System > Firmware > Plugins” page to find os-crowdsec. Click on the “+” button to install CrowdSec.
Enable CrowdSec
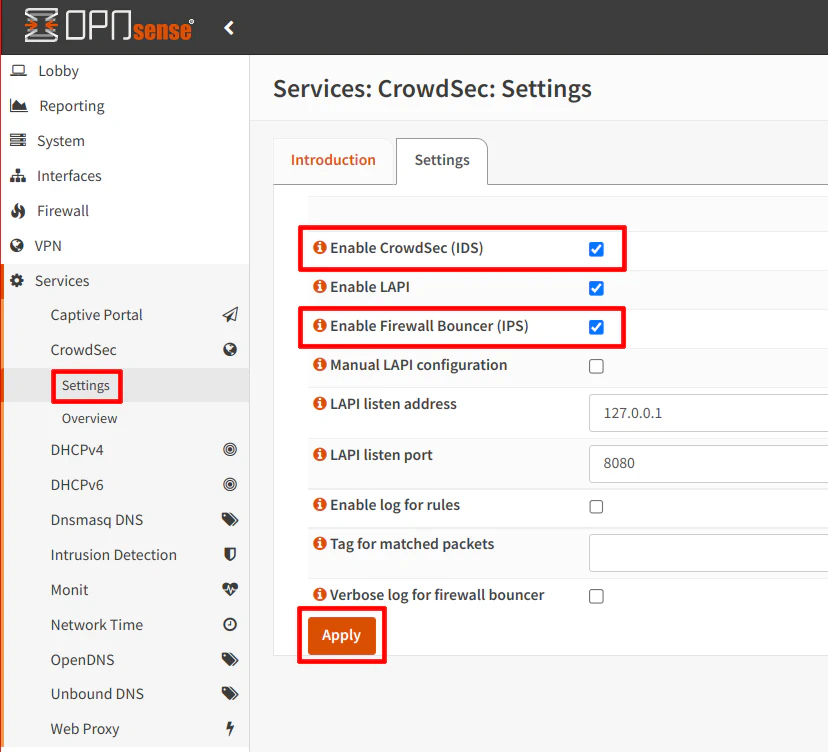
Note that nothing will be blocked by the firewall unless you enable the bouncer. CrowdSec automatically creates floating rules to block all incoming IPv4/IPv6 malicious IP addresses. Also, it automatically generates block list aliases for IPv4 and IPv6 that you may use in your own custom firewall rules if you need them for other purposes.
Create Firewall Rules
As mentioned, CrowdSec automatically creates two floating firewall rules to block incoming malicious IPv4/IPv6 addresses if you enable the bouncer. This provides you with network-wide protection from those malicious IP addresses. However, you may also want to create firewall rules to block any outgoing connections to the malicious IPs. External malicious connections are blocked by default, but if for some reason any user/machine on your network tries to initiate a request to a malicious IP address, it will be allowed unless you explicitly block the connection.
To do this, you can create two floating rules for the LAN/VLAN interface(s) you wish to protect by going to the “Firewall > Rules > Floating” page. Select the interface(s) in which you want the rule to be applied using the “Interface” option. You can use “any” as the source addresses and the crowdsec_blacklists alias as the destination. You will need to create a separate rule for IPv4 and IPv6 if you wish to have both.
The following rule blocks outgoing connections to the CrowdSec IP block list:
| Option | Value |
|---|---|
| Action | Block |
| Interface | LAN (DMZ, IOT, GUEST, or other interfaces you wish to protect) |
| Direction | in (needs to be “out” if you select the WAN interface – see note below) |
| TCP/IP Version | IPv4 (or IPv6) |
| Protocol | any |
| Source | any |
| Source Port | any |
| Destination | crowdsec_blacklists (or crowdsec6_blacklists for IPv6) |
| Destination Port | any |
| Description | Block outgoing connections to IPs on the CrowdSec block list |
If you select the WAN interface, the direction needs to be set to out because you want to filter traffic leaving the firewall. For all of your internal networks, using in works because all traffic from devices on your network enters into each network interface. Therefore, outgoing traffic can be blocked with the direction of in. Using the direction of out for your internal networks will work, but it is less efficient to process firewall rules on the local interfaces using the out direction.
If you only want to filter on the WAN interface in the floating rule, you could simply create a rule with direction out on the WAN interface itself.
Register for the CrowdSec Console (Optional)
If you wish to take advantage of the free CrowdSec Console, go to the CrowdSec Console registration page. Once you have created an account, you can add your OPNsense instance to the Console by running the command shown on the “Instances” page, which is the default page which opens after logging in. If you already have at least one instance, you can add another instance by clicking on the “Add Instance” button on the “Instances” page.
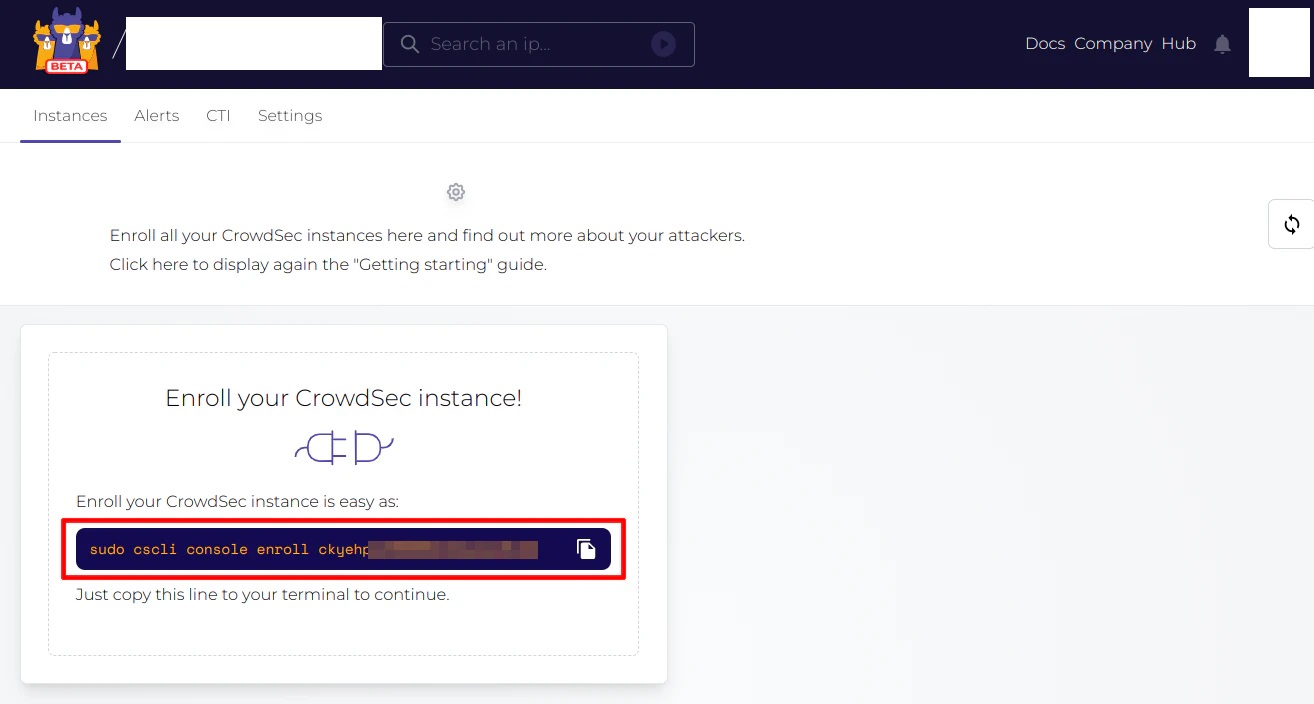
Once you run the command above (using the shell via SSH) on your OPNsense system, you will be prompted for an enrollment request when you refresh the webpage.
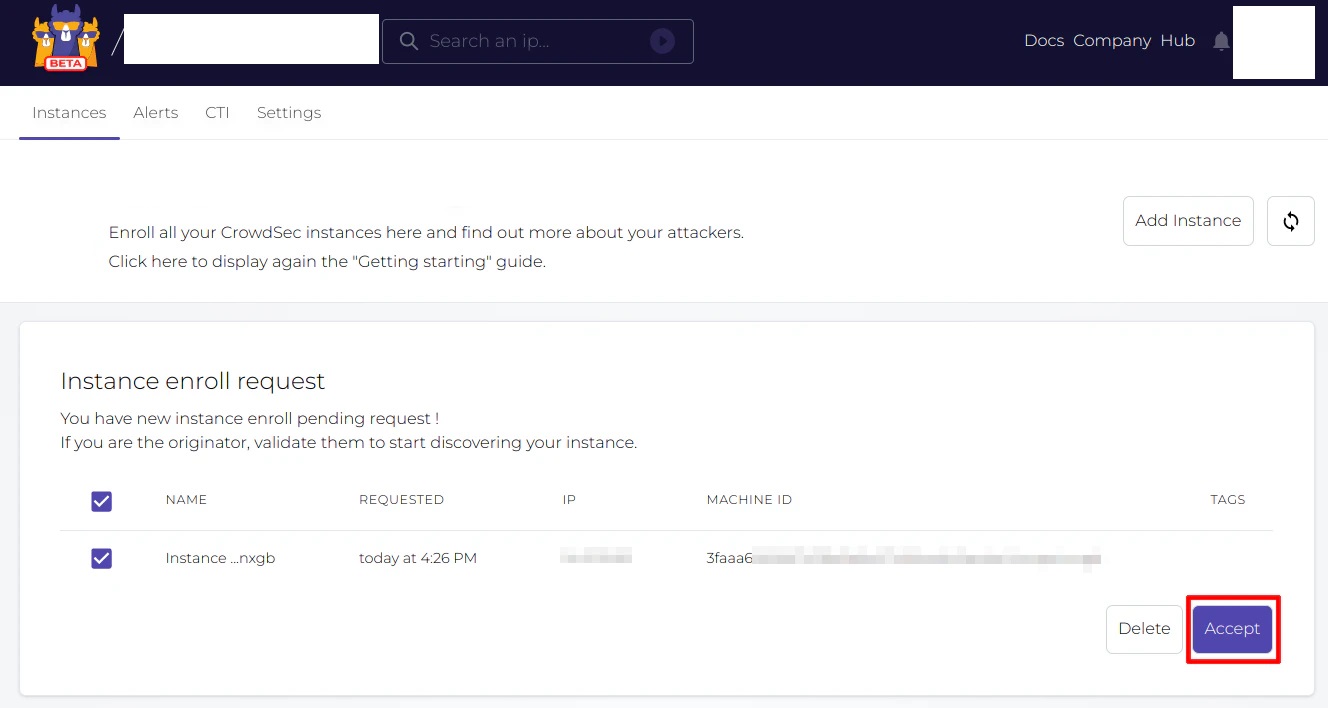
After enrollment is complete, you will see the instance in the CrowdSec Console.
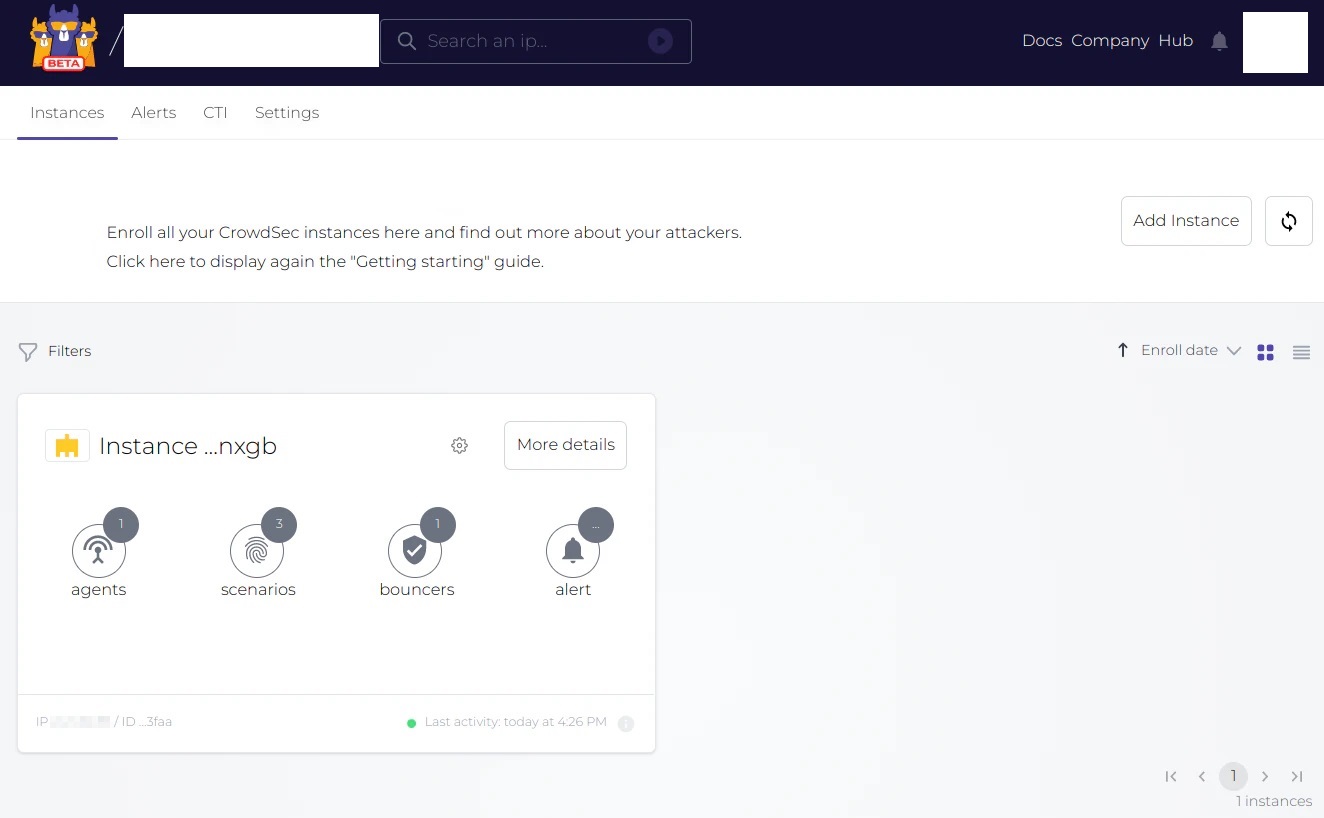
As you can see, it is very simple to add your CrowdSec instance to the CrowdSec Console!
Test that CrowdSec is Operational
You should try testing CrowdSec after everything is set up to ensure proper functioning. One way is to manually add a temporary ban entering an IP address of your choice (if you use the same IP you are currently logged in with, you will lose access to SSH for 1 minute). You should notice that you are temporarily locked out of SSH after running the following command:
sudo cscli decisions add --ip 192.168.1.10 --duration 1m
If you registered for the CrowdSec Console, you will see the event under the “Alerts” page.