
Configuring Proxmox to use NAT Networking
By default, Proxmox configures your primary NIC (Network Interface Card) to work in bridged mode. For normal installations, this is the best configuration - VMs and CTs that you create automatically get assigned a DHCP address from your router so can easily access your local network.
In some cases however, bridged networking may be unsuitable (if you are connected to a local network with a low number of free IP addresses) or impossible to use. Many Dedicated Server providers say that you need to purchase a secondary external IP address in order to run Proxmox in bridged mode. With NAT mode you can get away with only using a single external IP address.
Creating the NAT network
Modifying the /etc/network/interfaces file
First, ssh into your Proxmox node and make a copy of the interfaces file as below. We're going to be making significant changes to it, so making a backup will make it easier to revert if something goes wrong:
cp /etc/network/interfaces /etc/network/interfaces.oldThen open /etc/network/interfaces in your preferred text editor:
nano /etc/network/interfacesHere is the standard Proxmox interfaces file - yours will look similar to this, the iface will depend on your hardware (in this example enp2s0) and IP address will be the one set during installation.
auto lo
iface lo inet loopback

iface enp2s0 inet manual

auto vmbr0
iface vmbr0 inet static
	address 192.168.1.253/24
	gateway 192.168.1.1
	bridge_ports enp2s0
	bridge_stp off
	bridge_fd 0
Here is an example of the required interface file for NAT networking. The external IP address definition is moved from vmbr0 to enp2s0, and vmbr0 is renamed to vmbr1. vmbr1 is given an IP address in a different subnet and has bridge-ports set to none. You can use any subnet within the internal IP address space, but make sure it's different to the subnet used in your "external" network. In the below example, my "external" network lies in the 192.168.1.x address space, and I used 10.10.10.x as the NAT subnet.
auto lo
iface lo inet loopback

auto enp2s0
	iface enp2s0 inet static
	address 192.168.1.253/24
	gateway 192.168.1.1

auto vmbr1
	iface vmbr1 inet static
	address 10.10.10.1/24
	bridge-ports none
	bridge-stp off
	bridge-fd 0

pre-up iptables-restore < /etc/iptables.conf
post-up iptables -t nat -A POSTROUTING -s '10.10.10.0/24' -o enp2s0 -j MASQUERADE && iptables -t raw -I PREROUTING -i fwbr+ -j CT --zone 1
pre-down iptables-save > /etc/iptables.conf
post-down iptables -t nat -D POSTROUTING -s '10.10.10.0/24' -o enp2s0 -j MASQUERADE
Enabling IP Forwarding
The post-up and post-down definitions are required to allow VMs and CTs to access the external network. They won't function however without modifying /etc/sysctl.conf - open it in your preferred text editor:
nano /etc/sysctl.confOnce opened, find this line and uncomment it: (net.ipv4.ip_forward=1)
# Uncomment the next line to enable packet forwarding for IPv4
net.ipv4.ip_forward=1
Reboot the Proxmox node
rebootOnce rebooted, create you can start creating VMs or CTs.
Connecting your Virtual Machines and LXC Containers to the NAT network
LXC Containers (CTs)
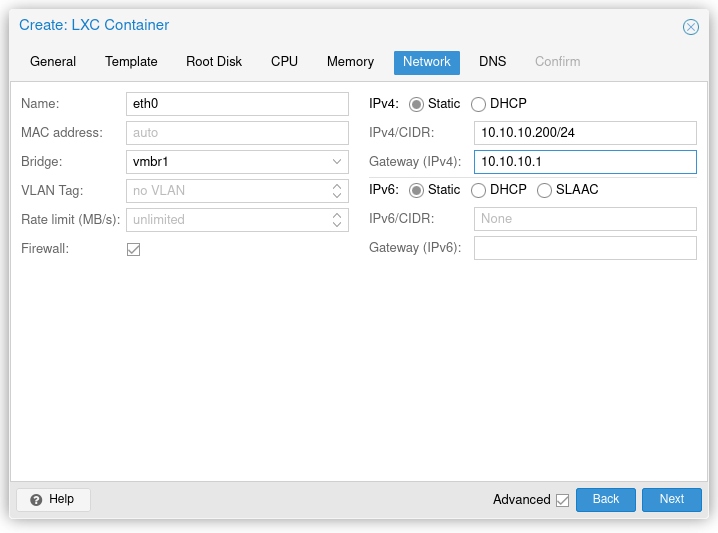
For LXC Containers, the bridge selected under the Network tab should default to vmbr1. Select Static in the IPv4 section and specify an address within the subnet you chose earlier. Enter vmbr1's IP address in the gateway field.
Assuming you configured things correctly, the CT should now have outbound network access! A quick ping will confirm this:
root@Ubuntu-20-04-CT:~# ping google.com
PING google.com (172.217.169.14) 56(84) bytes of data.
64 bytes from lhr25s26-in-f14.1e100.net (172.217.169.14): icmp_seq=1 ttl=115 time=22.7 ms
64 bytes from lhr25s26-in-f14.1e100.net (172.217.169.14): icmp_seq=2 ttl=115 time=22.4 ms
64 bytes from lhr25s26-in-f14.1e100.net (172.217.169.14): icmp_seq=3 ttl=115 time=23.0 ms
64 bytes from lhr25s26-in-f14.1e100.net (172.217.169.14): icmp_seq=4 ttl=115 time=22.9 ms
^C
--- google.com ping statistics ---
4 packets transmitted, 4 received, 0% packet loss, time 3002ms
rtt min/avg/max/mdev = 22.444/22.766/22.992/0.211 ms
QEMU Virtual Machines (VMs)
Proxmox QEMU VMs will also use vmbr1 as their network interface. Unlike containers, the Operating System itself will need to lease it's IP address. Proxmox doesn't contain a DHCP server, so network autoconfiguration will fail:

Fortunately, you can select "Configure network manually" and set a static IP address like we did with the container above. Be aware that Proxmox does not act as a DNS server either, so you will need to change the suggested IP. You can either use the upstream DNS provider (if on a local network) or a public DNS provider e.g. Cloudflare (1.1.1.1), Google (8.8.8.8) or OpenDNS (208.67.222.222). After this is configured, installation should proceed as normal.

Port forwarding to the guests
Our guests are now connected to the internet via a NAT network. Our Proxmox node is acting as the router, allowing packets originating from guests to reach the external hosts. But what about incoming traffic? For this, we must utilise the prerouting function of iptables.
Creating a port forward rule
In this example, we want to forward TCP port 20022 on our Proxmox node to TCP port 22 on 10.10.10.200 (the Ubuntu CT created earlier). 192.168.1.253 is our Proxmox node's "external" IP address:
iptables -t nat -A PREROUTING -d 192.168.1.253/32 -p tcp -m tcp --dport 20022 -j DNAT --to-destination 10.10.10.200:22To do the same but with a restriction on which source IP addresses are allowed, include the -s flag with the allowed address in CIDR format (1.1.1.1/32 is used in this example):
iptables -t nat -A PREROUTING -s 1.1.1.1/32 -d 192.168.1.253/32 -p tcp -m tcp --dport 20022 -j DNAT --to-destination 10.10.10.200:22TCP ports 22 (SSH) and 8006 (HTTPS) are used for managing Proxmox. If you specify either of these ports as the "external" port, you will risk losing access to your node! Proxmox's SSH port can be changed, but the HTTPS port is fixed.
Testing TCP port forwards with telnet
In the above example, we forwarded a TCP port. Telnet is great for quickly testing whether TCP ports are open. To test a port, enter telnet followed by the IP address or hostname, followed by the port number:
telnet 192.168.1.253 20022If the port forward is working as intended, you should see an output similar to this:
Trying 192.168.1.253...
Connected to 192.168.1.253.
Escape character is '^]'.
SSH-2.0-OpenSSH_8.2p1 Ubuntu-4
Listing active port forwards
After adding the iptables rule, list all prerouting rules:
iptables -t nat -v -L PREROUTING -n --line-numberRunning this command should provide an output similar to below:
Chain PREROUTING (policy ACCEPT 11 packets, 592 bytes)
num   pkts bytes target     prot opt in     out     source               destination
1        0     0 DNAT       tcp  --  *      *       0.0.0.0/0            192.168.1.253        tcp dpt:20022 to:10.10.10.200:22
Deleting a port forward rule
Removing iptables prerouting rules is very simple. Instead of -A (Add), we will use -D (Delete). Specify a line number from the previous output (1 is used in this example):
iptables -t nat -D PREROUTING 1Then, list all of the rules again - this will confirm that it has been removed:
root@pve:~# iptables -t nat -v -L PREROUTING -n --line-number
Chain PREROUTING (policy ACCEPT 0 packets, 0 bytes)
num   pkts bytes target     prot opt in     out     source               destination
No comments to display
No comments to display